X68000 Programming chapter 6, TRS programs.

Introduction:

Human68k is an MS-DOS like operating system and as such it isn’t multi-tasking, or it is?

Humand68K provides us with the capability to do something that resembles multitasking.

We can build a TSR program which stands for Terminate and Stay Resident.

A TSR program is one that starts, does some setups and terminates but instead of being tear down from memory it stays.

The setups are normally to install an interruption that runs a sub routine or function.

We can do things like run the function when the interruption of pressing certain keyboard keys triggers or we could be watching some printer event.

Human68k has a place in memory with a vector that points to the different system routines when certain interrupts happen.

A program doesn’t need to be made resident or TSR to exploit these interruptions, in fact most of the video games utilize them to track things like the vertical or horizontal scan-line and so do graphic effects or just time the frames.

But a TSR program is only useful by using these interruptions.

Once a TSR program is in memory and runs when triggered by interruptions we can still use the operating system as if it was multitasked.

In this article I’m going show the instructions, the data structures, how to make a program resident and a mechanism to communicate with it through a command line interface.

The instructions:

The key instructions that make it possible are the following:

struct _psp* _dos_getpdb()			//get the Program Segment Prefix

void* _dos_intvcs(int intno, void* jobadr)	//Set vector handling address	

void _dos_keeppr (int prglen, int code)		//Terminate and reside

Along the way we will see a bunch of other instructions but these three are the important ones.

We will be following the source code at:

https://github.com/FedericoTech/X68KTutorials/blob/main/blogresi/main.c

The program in memory:

We first need to understand how a program are stored in memory.
Here is a chart that shows how a program is stored in memory and the functions to manipulate the different aspects.
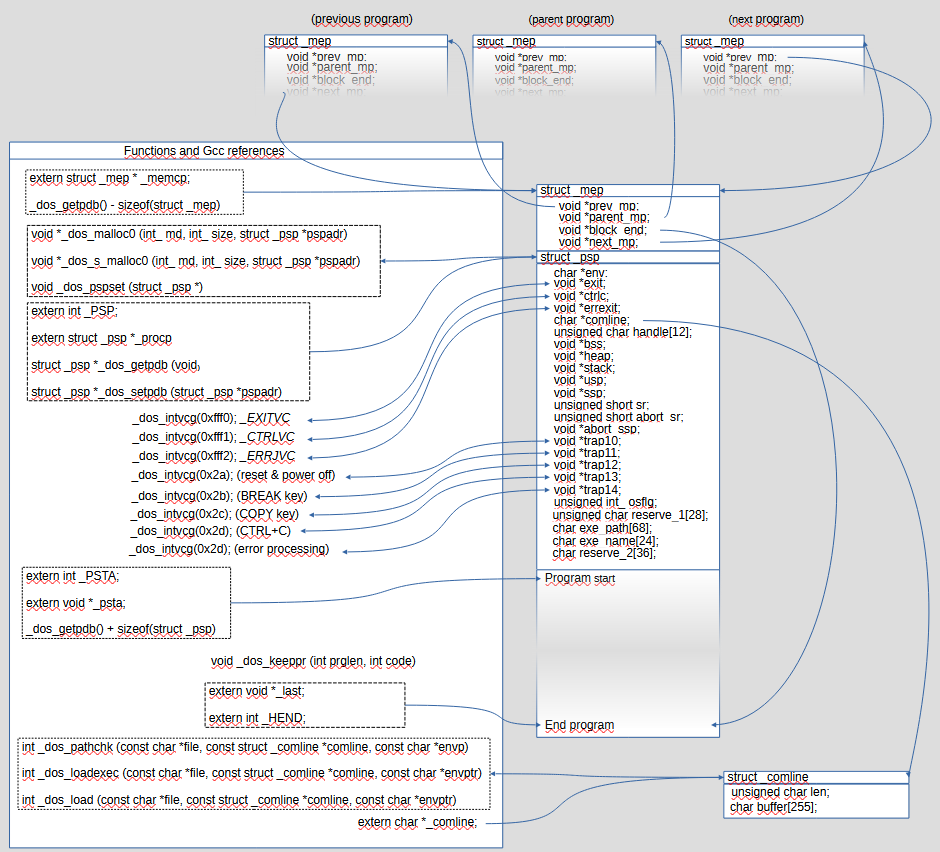
When we run a program or stays resident, the operating system keeps track of it with two data structures. One structure is struct _psp that stands for Program Segment Prefix (PSP) and the other is struct _mep which might stand for Memory Entry Pointer (MEP).

Program Segment Prefix (PSP) data structure.

The Program Segment Prefix is a data structure where MS-DOS like operating systems keep track of the different parameters of the program.

Parameters such pointers to the command line string, the environment variables, the filename and path, OS flags, the heap, the User Stack Pointer and Supervisor Stack Pointer, the exit, error and Ctrl+C routines, etc.

The declaration of the Program Segment Prefix structure is like this:

There are a few ways to get the pointer to this data structure:

struct _psp {
    char *env;					// Pointer to environment variables.
    void *exit;					// Pointer to the Exit routine.
    void *ctrlc;				// Pointer to the CTRL+C routine
    void *errexit;				// Pointer to the Error routine.
    char *comline;				// Pointer to the command line data structure
    unsigned char handle[12];		
    void *bss;					// Pointer to the Block Started by Symbol
    void *heap;					// Pointer to the heap
    void *stack;				// Pointer to the stack
    void *usp;					// User Stack Pointer
    void *ssp;					// Supervisor Stack Pointer
    unsigned short sr;			// Status Register
    unsigned short abort_sr;	// backup of Status Register when interrupted (perhaps)
    void *abort_ssp;			// Supervisor Stack Pointer backup when interrupted (perhaps)
    void *trap10;			
    void *trap11;
    void *trap12;
    void *trap13;
    void *trap14;
    unsigned int_ osflg;		// OS flags
    unsigned char reserve_1[28];	// (1.b module number, 3.b unused, 1.l Memory management pointer for loaded child process, 5.l unused)
    char exe_path[68];			// path to the exec
    char exe_name[24];			// name of the exec
    char reserve_2[36];
};

The struct _psp* _dos_getpdb(); function.

Some compilers provide pointers to it:

The address extern int _PSP; in integer format.

The pointer extern struct _psp *_procp; in pointer format.

Memory Entry Pointer (MEP) data structure.

The Memory Entry Pointer is a double linked list that relates the program with other programs in memory, it sits right before the PSP, and looks like this:

struct _mep {
    void *prev_mp;
    void *parent_mp;
    void *block_end;
    void *next_mp;
};

struct _mep has 4 pointers and it’s 16 bytes long. 4 bytes per pointer.

The first field void *prev_mp points to the struct _mep of the previous program.
The second field void *parent_mp points to the struct _mep of the program that started this program, normally Command.com.
The third field void *block_end points to the last byte of the program in memory.
The forth field void *next_mp points to the struct _mep of the next program.

There are a few ways to get the MEP data structure:

The first and foremost is by getting the PSP address with the function struct _psp* _dos_getpdb(); and subtract the size of MEP which is 16 bytes.

struct _mep* mep = (struct _mep*)((int) _dos_getpdb() - sizeof(struct _mep));

or combinations with the PSP pointers should the compiler makes then available:

struct _mep* mep = (struct _mep*) (_PSP  - sizeof(struct _mep));

struct _mep* mep = (struct _mep*) ((int) _psp  - sizeof(struct _mep));

Some compilers give straight forward access trough a pointer.

extern struct _mep *_memcp;	// direct access to it

Some compilers also give straight away access to void *block_end with a pointer or an int.

extern void *_last; // pointer format

extern int _HEND; //integer format

The program.

There is not much to say, the program seats right after PSP all the way to void *block_end.

Finding the resident program.

Our program will have two parts, the resident part and the non resident part.

The resident part is just a function that executes a task when triggered by an interruption.

The non-resident part gives us an interface to setup and tear down the resident part.

When the non-resident part starts will explore the program list to find out whether the resident part is already setup in order to safely set it up or tear it down.

When exploring the program list we are going to look for a sequence of bytes, a word, that the resident program will have right after the MEP and PSP structures and at the beginning of the program so that we can find it.

In this example I’ll use the struct _psp* _dos_getpdb(); rather than the pointers because they are not available in all the toolchains.

#ifdef __MARIKO_CC__
	#include 
	#include 
#else
	#include 
	#include 

	//substitutions for Lyndux toolchain
	#define interrupt __attribute__ ((interrupt_handler))
	#define _mep dos_mep
	#define _psp dos_psp

	// _dos_getpdb() is broken
	extern int _PSP;
	#define _dos_getpdb() (void*)_PSP
#endif

int main(int argc, char *argv[])
{
	struct _psp* psp = _dos_getpdb();
	struct _mep* mep = (struct _mep*)((int) psp - sizeof(struct _mep));
	void* start_program = (void *)((int) psp + sizeof(struct _psp));
	void* end_address = mep->block_end;
}

Because it’s running on the non-resident part, this is for sure the last program in the list so we need to explore the programs behind it. The address to the previous program is in the field prev_mp This is also the address of the its MEP struct.

As it belongs to the current program we can manipulate it without any supervisor privilege so we can store it in an int var straight away:

resident_start_addr =  (unsigned int) mep-> prev_mp;

Alternatively, as the address is in the very first field we can just do this:

resident_start_addr =  (unsigned int) mep;

Now we need to loop all until the resident_start_addr is 0, but because we will be reading areas of memory outside our program we need to either activate supervisor privileges with int _dos_super(long stack); or using functions that allows us to get the content of those addresses.

Using int _dos_super(long stack); is easier but in this example I decided to use the other functions so that we get to know them.

The loop will look like this:

while(resident_start_addr != 0){
	// we read a long word with _iocs_b_lpeek so that we don't need to go Super
	resident_start_addr = _iocs_b_lpeek((void *) resident_start_addr);
	// check something and exit the loop
}

So we use the function int _iocs_b_lpeek (const void *addr); to get the int size content of the address given.

Now we have the ability to explore the program list but we need to find something that identifies the resident program.

As afore mentioned, in this example, the strategy is to place something in the program memory that we can find relative to the program that identifies it if present.

This is a very low level solution that I found in an assembly program and I managed to replicate in C.

As we saw so far we can get the PSP data structure. In front of it is the MEP data structure and behind it is the program.

We can hardcode some information right at the beginning of the program so that we can find it next time.

This information will be a C string variable whose space is set in assembly code.

For this to work, if the program we are building has more object files, the file where the main function is has to be first in the compilation and linking commands, otherwise we will be able to set up the TSR but not find it in memory.

Another consideration is that these assembly has to be before any initialization or implementation.
We can do forward declarations or declare variable but if we initialize them we also lose the place.

The code is the following:

extern char keyword[4]; // declaration only

asm("	_keyword:	.ds.b	4	    "); //this is the actual storage.
int found = 0;	//flag in case we find the resident program.
int main(int argc, char *argv[])
{
	unsigned int resident_start_addr;
	struct _mep* mep = (struct _mep*)((int) _dos_getpdb() - sizeof(struct _mep));
	resident_start_addr =  (unsigned int) mep-> prev_mp;

As you may notice, the assembly variable name is _keyword: whereas the variable in our C doesn’t have the preceding underscore. This may differ in other toolchains and need to add the underscore.

If we have followed the steps correctly we will have the variable keyword stored right at the beginning of the program so we can find it always.

The keyword variable is for us to set this identification word before we make the program resident.

The identification word should be a word that can’t be mistaken with an assembly opcode so it’s guaranteed we won’t find the same combination of bytes at the beginning of other programs and to prevent the CPU from trying to execute it.

In this example “MMV” is a safe word as there is no such combination of bytes in the M68000 instructions set.

Back to loop we now search for this word:

extern char keyword[4]; // declaration only

asm("	_keyword:	.ds.b	4	    "); //this is the actual storage.
int found = 0;	//flag in case we find the resident program.
int main(int argc, char *argv[])
{
	unsigned int resident_start_addr;
	struct _mep* mep = (struct _mep*)((int) _dos_getpdb() - sizeof(struct _mep));
	resident_start_addr =  (unsigned int) mep-> prev_mp;

	while(resident_start_addr != 0){
		char keyword[4] = {0}; // we will copy the first 4 bytes found in other programs in this var.

		// we read a long word with _iocs_b_lpeek so that we don't need to go Super
		resident_start_addr = _iocs_b_lpeek((void *) resident_start_addr);

		//we capture the address of the beginning of the program
		void * beginning_of_program = (void *)resident_start_addr + sizeof(struct _mep) + sizeof(struct _psp);

		//we copy three byte in our buffer. we use _iocs_b_memstr so that we don't need to go Super
		_iocs_b_memstr(
			beginning_of_program,
			keyword,
			3
		);

		//if we find the process
		if(strncmp(“MMV”, keyword, 3) == 0){
			found = 1;
			break;
		}
	}

The algorithm above calculates the program starting address by adding the sizes of MEP and PSP and copies 3 bytes in the buffer keyword. Then we compare it to the word MMV and if found, we flag it and exit the loop.

It seems that in order to access certain data we need to be calculating offsets back and forth all the time, by getting the PSP address, then subtracting the size of MEP to get its address or to add the size of PSP in order to get the start address of the program in order to reach the keyword string. However there is a more direct way.

We can use an struct to map all.

struct resident {
	struct {
		struct _mep mep; //16   bytes
		struct _psp psp; //240 bytes
	} procc;    //256 bytes
	char keyword[4];    //here the program starts
}

The first time we will still need to get the pointer to PSP and subtract the size of MEP (16 bytes). But if we cast MEP’s pointer into (struct resident *), now we can access all the fields straight away, and inside the loop where we explore the program list, we can cast the address with this type too.

Let’s do the changes:

struct resident {
	struct {
		struct _mep mep; //16   bytes
		struct _psp psp; //240 bytes
	} procc;    //256 bytes
	char keyword[4];    //here the program starts
};

extern char keyword[4];

asm("	_keyword:	.ds.b	4	    "); //this is the actual storage.
int found = 0;	//flag in case we find the resident program.
int main(int argc, char *argv[])
{
	unsigned int resident_start_addr;
	struct resident * _resident, * resident_aux;

	struct _psp* psp = _dos_getpdb();

	_resident = (struct resident *)((unsigned int) psp - sizeof(struct _mep));

	resident_start_addr = (unsigned int) _resident->procc.mep.prev_mp;
	while(resident_start_addr != 0){
		char keyword[4] = {0}; // we will copy the first 4 bytes found in other programs in this var.

		void* beginning_of_program;

		// we read a long word with _iocs_b_lpeek so that we don't need to go Super
 		resident_start_addr = _iocs_b_lpeek((void *) resident_start_addr);

		//we capture the address of the beginning of the program
		resident_aux = (struct resident *) resident_start_addr;

		//we copy three byte in our buffer. we use _iocs_b_memstr so that we don't need to go Super
		_iocs_b_memstr(
			resident_aux->keyword,
			keyword,
			3
		);

		//if we find the process
		if(strncmp("MMV", keyword, 3) == 0){
			found = 1;
			break;
		}
	}

	if(found) {
		// what is next?
	}
};

The task

The purpose of making a program TSR is to do a task in the back ground.

We need to implement a function. This function isn’t any function but has to be an interrupt.

If the compiler provides the library we can do #include <interrupt.h> and the declare the function like this:

#include <interrupt.h>

void interrupt process_start();

If the compiler doesn’t have the interrupt library we still can declare it this way:

void __attribute__ ((interrupt_handler)) process_start();

This function is going to be trigger by some interruption of the system.

It might be that the interruption triggers very little, only when we hit certain key, or very often as the vertical scan line interruption 60 times per second or even faster every millisecond.

If the function takes too long to execute it might happen that interrupt itself interrupts it and starts a new execution instance and the whole thing enters a deadlock and eventually the system crashes. This is a racing condition.

In order to prevent this we can have a flag that acts as a mutex for mutual exclusion so that if the new interruption call finds the mutex set to 0 it means that the previous execution is still on so that it finishes and the control comes returns to the point where it got interrupted.

The mutex flag has to be volatile so that we tell the compiler that to change it has side effects and it doesn’t optimize it out.

The task in this example is a counter that shows in the top most left corner in yellow color every second.

 int counter;
int volatile mutex = 1;

//the resident program is this interrupt
void interrupt process_start() //it has to be an interrupt
{
	//we check whether the interrupt is still being processed
	if(mutex){
		mutex = 0; //we hold the mutex

		//only do things every 100 cycles
        	if(++counter % 100 == 0){
			//we get the current position of the cursor
			int cursor_pos = _iocs_b_locate(-1, -1);

			//we get the current colour.
			char previous_color = _iocs_b_color(-1);


			//we move the cursor to the top left corner
			_iocs_b_locate(0, 0);

			//we change the colour
			_iocs_b_color(2 + 4 + 8);

			printf("Count %d\n", counter);


			//we re establish cursor's position
			_iocs_b_locate((cursor_pos >> 16) & 0xffff, cursor_pos & 0xffff);

			_iocs_b_color(previous_color);
        	}

		mutex = 1;
	}
}

Making the program TSR.

So, now we have a way to find the resident instance of our program and the task but we haven’t made it resident yet.

We need to set up an interruption with the instruction void* _dos_intvcs(int intno, void* jobadr) and exit the program with void _dos_keeppr (int prglen, int code).

The instruction void* _dos_intvcs(int intno, void* jobadr) takes the number of interruption from the vector of interrupts and the address to our task. As a return it gives us the current address of the interruption.

In this URL you can find at the end the table of interruptions and pick one to use: https://www.chibiakumas.com/68000/x68000.php

In my example I’m using the interrupt 0x45, UserInterrupt: MFP Timer-C (Mouse/cursor/FDD control, etc.) which triggers 100 times per second.

When setting up the interruption we need to keep the address it returns so that we can restore it when the resident part, the one in the background ends.

In my example I’m storing the returned address in the pointer oldvector which I’m also using as a flag in the place of found.

It is not necessary to do it this way, you can use a normal variable but in my example I’m using another variable declared with assembly after the keyword variable. Therefore I’ll include it in struct resident.

The instruction void _dos_keeppr (int prglen, int code) takes the size of the program as first parameter and the exit code as second.

The length of the program is from the end of PSP to the address pointed by the field void *block_end in MEP.

There are various ways to work out the size:

struct _psp* psp = _dos_getpdb();

struct _mep* mep = (struct _mep*)((unsigned int) psp - sizeof(struct _mep));

unsigned int start_program_adders =  (unsigned int) psp + sizeof(struct _psp);

_dos_keeppr((unsigned int) mep-> block_end -  start_program_adders, 0);

If the compiler allows it we can just do:

unsigned int start_program_adders = _PSP + sizeof(struct _psp);

_dos_keeppr(_HEND – start_program_adders, 0);

To make the program resident then we do this sequence of instructions:

unsigned int resident_addr, end_addr;
//the program starts right where the keyword is.
resident_addr = (unsigned int) &_resident->keyword;
//where is where the program ends
end_addr = (unsigned int) _resident->procc.mep.block_end;      

//we set the keyword
_iocs_b_memstr(
	KEYWORDS,
	&keyword,
	3
);

//we get the current vector address
oldvector = _dos_intvcs(TIMER_C, process_start);

_dos_c_print("resident program started\r\n");

//we make the program resident
_dos_keeppr(
	end_addr - resident_addr,   //memory from beginning of the program
	0                           //exit code.
);

If the program is already resident, though, we are going to restore the interrupt, stop it and tear it down.

The code to do that is this:

// we remove it

_dos_intvcs(TIMER_C, oldvector); //we reestablish 0x45

_dos_mfree(&resident_aux->procc.psp); //psp_addr

_dos_c_print("resident program stopped\r\n");

Our final version looks like this:

#ifdef __MARIKO_CC__
	#include <doslib.h>
	#include <iocslib.h>
#else
	#include <dos.h>
	#include <iocs.h>
	#include <stdio.h>

	//substitutions for Lyndux toolchain

	#define interrupt __attribute__ ((interrupt_handler))
	#define _mep dos_mep
	#define _psp dos_psp
	#define oldvector _oldvector

	// _dos_getpdb() is broken
	extern int _PSP;
	#define _dos_getpdb() (void*)_PSP
#endif

#define 	TIMER_C 	0x45
#define 	KEYWORDS	"MMV"


struct resident {
	struct {
		struct _mep mep; //16   bytes
		struct _psp psp; //240 bytes
	} procc;    //256 bytes
	char keyword[4];    //here the program starts
	void * oldvector;
};

extern char keyword[4];
extern void * oldvector;

void interrupt process_start();	//forward declaration valid before the assembly.

//these have to be the very first thing
asm( "	_keyword:	.ds.b	4		" ); // zero initialized 4 byte storage for keyword
asm( "	_oldvector:	.dc.l	0		" ); // oldvector address also initialized by 0

int main(int argc, char *argv[])
{
	struct resident * _resident, * resident_aux;

	int resident_start_addr;
	struct _psp* psp = _dos_getpdb();

	_resident = (struct resident *)((unsigned int) psp - sizeof(struct _mep));

	resident_start_addr = (unsigned int) _resident->procc.mep.prev_mp;

	while(resident_start_addr != 0){
		char keyword[4] = {0}; // we will copy the first 4 bytes found in other programs in this var.
		void* beginning_of_program;
		// we read a long word with _iocs_b_lpeek so that we don't need to go Super
		resident_start_addr = _iocs_b_lpeek((void *) resident_start_addr);

		//we capture the address of the beginning of the program
		resident_aux = (struct resident *) resident_start_addr;

		//we copy three byte in our buffer. we use _iocs_b_memstr so that we don't need to go Super
		_iocs_b_memstr(
			resident_aux->keyword,
			keyword,
			3
		);

		//if we find the process
		if(strncmp(KEYWORDS, keyword, 3) == 0){
			//we copy the current value of the offset 4 from the beginning of the program which is the  oldvector declared in assembly.
			oldvector =  (void *) _iocs_b_lpeek(&resident_aux->oldvector);
			break;
		}
	}

	// if found...
	if(oldvector) {
		// we remove it
		_dos_intvcs(TIMER_C, oldvector); //we reestablish 0x45
		_dos_mfree(&resident_aux->procc.psp); //psp_addr
		_dos_c_print("resident program stopped\r\n");
	//if not found
	} else {
		unsigned int resident_addr, end_addr;
		//the program starts right where the keyword is.
		resident_addr = (unsigned int) &_resident->keyword;			
		//where is where the program ends
		end_addr = (unsigned int) _resident->procc.mep.block_end;	  

		//we set the keyword
		_iocs_b_memstr(
			KEYWORDS,
			&keyword,
			3
		);

		//we get the current vector address
		oldvector = _dos_intvcs(TIMER_C, process_start);

		_dos_c_print("resident program started\r\n");

		//we make the program resident
		_dos_keeppr(
			end_addr - resident_addr,   //memory from beginning of the program
			0						   //exit code.
		);
	}
}

int counter;
int volatile mutex = 1;

//the resident program is this interrupt
void interrupt process_start() //it has to be an interrupt
{
	//we check whether the interrupt is still being processed
	if(mutex){
		mutex = 0; //we hold the mutex

		//only do things every 200 cycles
		if(++counter % 100 == 0){
			//we get the current position of the cursor
			int cursor_pos = _iocs_b_locate(-1, -1);

			//we get the current colour.
			char previous_color = _iocs_b_color(-1);


			//we move the cursor to the top left corner
			_iocs_b_locate(0, 0);

			//we change the colour
			_iocs_b_color(2 + 4 + 8);

			printf("Count %d\n", counter);

			//we re establish cursor's position
			_iocs_b_locate((cursor_pos >> 16) & 0xffff, cursor_pos & 0xffff);

			//we re establish text colour
			_iocs_b_color(previous_color);
		}

		mutex = 1;
	}
}

So, now if we call the executable for the first time it will set up a counter on the screen that will be counting as we are still able to do something else, and when called a second time it’s going to find the resident instance and stop it.

I hope you enjoy this tutorial.

X68000 Programming chapter 5, Playing digital sound.

In this chapter I’m going to explain how to produce digital sound files compatible with X68000 and how to play them with some demos.

The X68000 comes equipped with the chip Oki MSM6258 ADPCM which makes it able to encode and decode sound files in Adaptive Differential Pulse-code Modulation (ADPCM) format.

The ADPCM format is vendor-dependant, each company has its own so we need a way to encode sound in the specific format X68000 works with.

To follow this tutorial you will need some software. I’ll assume that you have Git and the X68000 toolchain properly installed. If you haven’t yet you can follow these two articles:

The IDE in those articles is CodeBlocks which comes with MinGW as GCC compiler.

We will build a program from the sources we need to convert raw WAV into raw ADPCM.

You´ll also need Audacity which is an Open-source software for digital audio edition.

Understanding Digital sound.

Before we put hands on I think it is important an introduction on digital audio.

Sound is a physical phenomena that happens when energy propagates through the air in the form of air pressure waves. These waves are the sound we hear.

In nature waves are analogical and they are represented by continuous values which means that between two values there can be infinite smaller values.

Computer are machines that work with discrete values which means that between two values there are values that can’t be represented therefore, some information from the analogical realm is lost.

When digitalizing sound, computers take samples or snapshots of these waves at regular intervals called frequency, and these values, which are the amplitude of the waves, are represented by a number with a limited precision.

Probably you are familiar to the terms 44100 Hz 16bit CD quality. This means that to reach the CD quality we need 44100 samples per second, that is to say, 44100 slices of the waves each second and each slice is represented by 16 bit signed integer values.

With these two values we can draw a wave with a “resolution” of 44100 x 65,535 taking into account that these 16 bit values have sign so they are between -32,768 and 32,767.

Adaptive Differential Pulse-code Modulation (ADPCM)

Following the example of the CD quality above, to store one second with such sample rate and bit depth requires 88,200 bytes per channel. Mono sound uses one channel but stereo sound uses two.

Therefore one minute is over 5 mega bytes per channel. This is why we don’t store digital audio in a raw format but we compress it in MP3 or other formats in order to save disk space.

Back in the days of the X68000 we didn’t have MP3 but raw formats and the store capacity was at premium.

There is another way to digitally represent waveforms and that is with Adaptive Differential Pulse-code Modulation (ADPCM).

Instead of storing the amplitude of the wave in each sample which takes a 2 bytes for each of them, we store the “delta” which is the difference between one sample and the next.

The differences between samples most of the times can be represented by smaller values.

We still may have scenarios where the difference between two samples require the 2 bytes.

To solve this problem ADPCM implements a table with the 50 most common values between samples. These values are actually approximations and are designed to suit some sound requirements.

So, instead of storing amplitudes or differences between samples we store indices of this table per sample which takes less than a byte and saves storage at the cost of losing some information with still acceptable quality.

Each vendor had their own table to fit their own needs and for X68000 the vendor is Oki and the table is implemented in the chip Oki MSM6258 ADPCM.

Required Software

Now that we know how digital sound works and that we need to produce it in ADPCM format we can put hands on.

WAV to ADPCM converter.

First of all, we need a program that turns 16 bit signed integer waves into ADPCM compatible with X68000.

In github I found such program at https://github.com/superctr/adpcm It’s been developed by the user superctr and it’s of public domain.

As a first step we are going to compile this program.

git clone https://github.com/superctr/adpcm
cd adpcm
make

If you are in windows and have Mingw64 you can run mingw32-make instead of make.

Now we should have the adpcm.exe

Audacity

If you don’t have Audacity yet you can download it for free from https://www.audacityteam.org/download/

Converting a sound file into X68000 ADPCM format

In Audacity we can record sound or we can open some sound file like a WAV or MP3.

Either way we need to take into account that if the sound is to fit in a floppy disk we should work with not longer than 2.5 minutes. This is because the resulting file will take roughly 469014 bytes per minute.

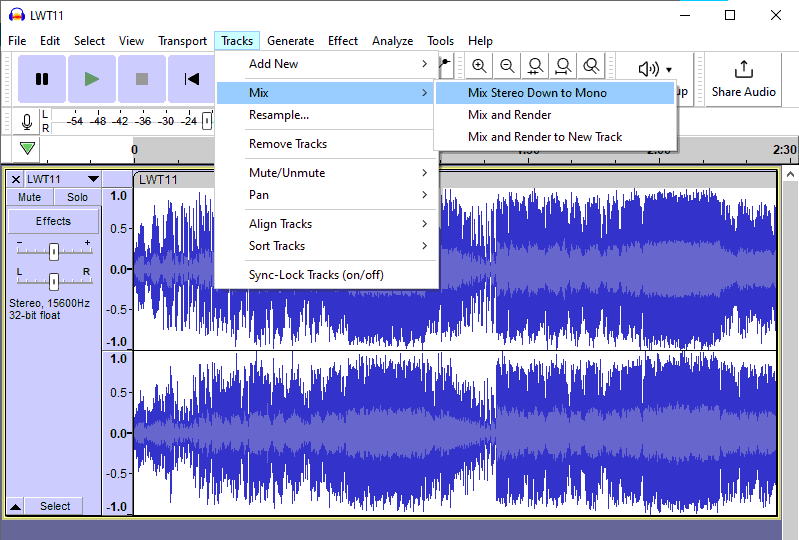
Once we have the audio from either microphone or any audio format, the first step is to make sure that it’s mono as X68000 play ADPCM music in mono.

In order to do that we do Track / Mix / Mix stereo down to mono

X68000 supports the following sample rates: 3.9Khz, 5.2Khz, 7,8Khz, 10,4Khz and 15,6Khz

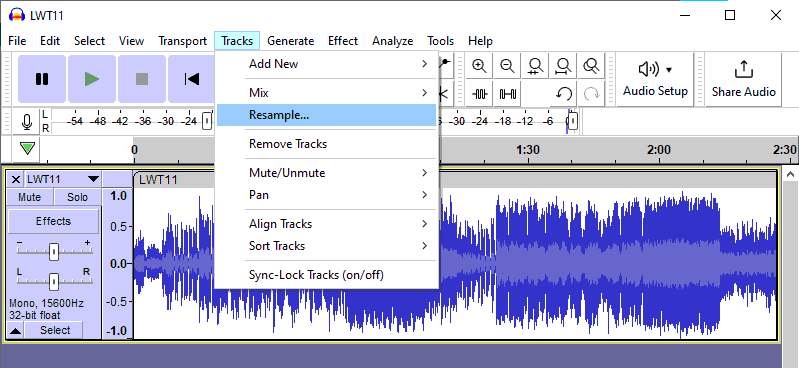
In our example we are going to use the highest, the 15.6Khz, so we need to resample the sound to that sample rate.

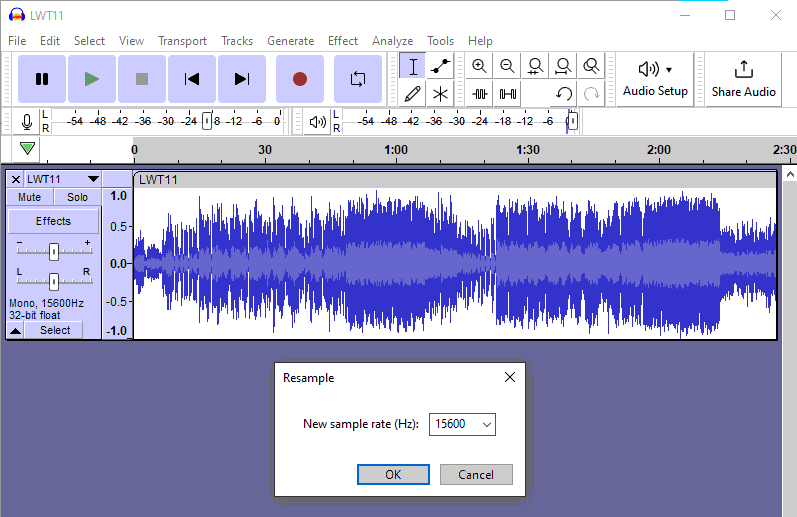
We need to go Track/Resample:

and enter the number 15600 in the dialogue.

Now we need to set that the audio is 44100, although it isn’t. Right click on the track and rate back to 44100

If we now play the sound it would run nearly 3 times faster. Setting the rate as it were 44100 is necessary for the adpcm.exe program to encode the audio correctly. If we left it as 15600 it would get encoded and wound in the X68000 as over 3 times slower.

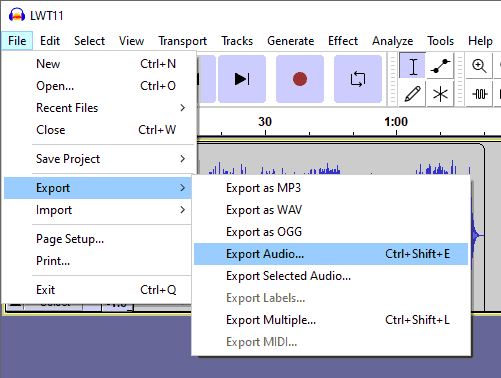
Now we need to export the sound. We do File / Export / Export Audio

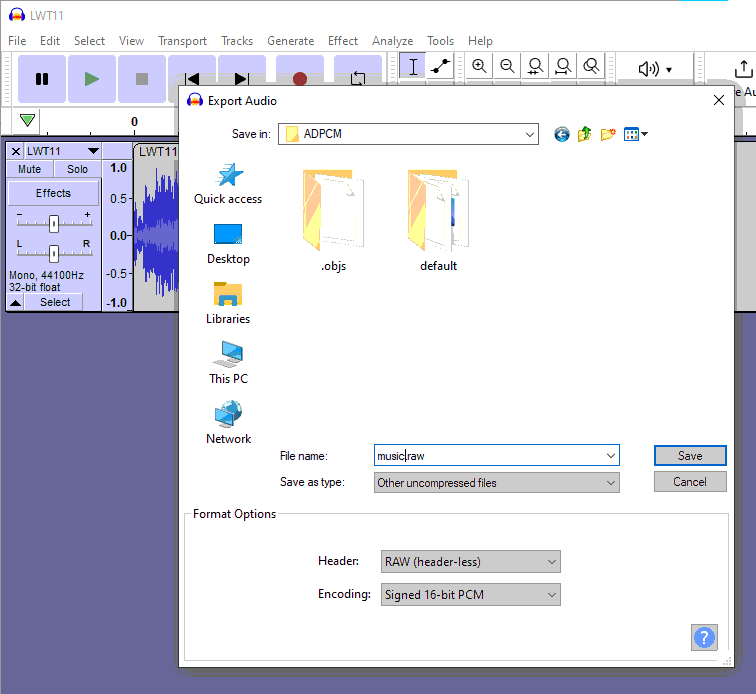
And in the dialogue we pick a folder, ideally where the adpcm.exe program is, and in the drop-down header we select RAW (header-less) and in the drop-down encoding Signed 16 – bit PCM.

In the next step we are going to encode the sound we just exported as Raw (header-less) Signed 16bit PCM into Oki’s ADPCM by using the adpcm.exe program we compiled earlier.

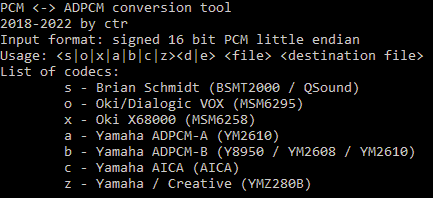
If we open a command line console and go where adpcm.exe is and we run adpcm.exe we´ll see its options:

As we can see we can encode the file into several formats and among which we have Oki X68000 (MSM6258)

We just need to run the following command:

adpcm.exe xe music.raw result.raw

This should generate the file result.raw in the format that X68000 can understand.

Now, to play this file we need a program in X68000.

In my github I have 3 programs that can play this file at the addresses: https://github.com/FedericoTech/X68KTutorials/tree/main/ADPCM

https://github.com/FedericoTech/X68KTutorials/tree/main/ADPCM2

https://github.com/FedericoTech/X68KTutorials/tree/main/ADPCM3

There are two files, ADPCM.cbp which is the codeblocks project file and main.c which is the program.

Download both and compile it for X68000 with Codebloks.

Now If you have an original X68000 you can try copying the generated program ADPCM.x and the audio file result.raw in a floppy disk.

If most probably you don’t have the original computer you’ll need an emulator.

With XM6-pro you need to put the executable ADPCM.x and the result.raw files in a directory and mount it as it was a floppy disk.

Whether you are testing it in the original X68000 or the XM6-pro, you just need to go to the unit:

B:

and run the program with the command:

adpcm

Program explanation

If you study the source code of ADPCM from my github you’ll see that we open the file with _dos_open, then we check the size with _dos_seek, we allocate memory with _dos_malloc room for two chunks.

With _dos_read we load the first chunk from the floppy disk.

Then we start a loop that repeats as long as we didn’t finish playing the sound.

In each loop we play a chunk of music with the function _iocs_adpcmout(buffer, mode, size)

Buffer is the address where the music starts.

Mode is a 16 bit word of flags where we tell by flags things like the sample rate and whether we want to play the sound in both speakers, the left speaker, the right speaker or non.
Remember that the music itself is mono but we can redirect it to one speaker or the two.

Size is the amount of data we want to send. It’s important to say that if the size is 65280 or less, the return is immediate and we can do something else whilst the music plays but if it’s more than that the CPU will wait and we won’t be able to execute any code until the music stops.

In this program the main loop loads two chunks of music alternatively each time to feed _iocs_adpcmout. As the chink is not larger than 65280 bytes we can execute a nested while loop that runs if the music is playing.

We can check whether the music is playing with the function _iocs_adpcmsns which tells us the current state of the music. In our loop we check whether it isn’t idle.

Inside the loop we test whether any key of the keyboard has been hit with the line if(_dos_inpout(0xFF) != 0). If so we exit the two loop.

If the function _iocs_adpcmsns says that the music has finished, we feed _iocs_adpcmout with the next chunk until there is no chunk left.

The other two programs ADPCM2 and ADPCM3 from my github are versions that run the music but making use of the functions _iocs_adpcmaot and _iocs_adpcmlot respectively.

If we send chunks of up to 65280 bytes we can leave the music playing on its own and we have the CPU available to run something else at the same time. This is possible because the functions _iocs_adpcmout, _iocs_adpcmaot and _iocs_adpcmlot make use of a dedicated DMA channel that frees the CPU from moving data from memory to the music device.

Creating a PHP module with C++.

PHP and C++ are two programming languages.

PHP is normally used as a server side language in web development. It’s interpreted which means that the program is written in plain text and a runtime program interprets it and executes the instructions.

C++ has application in many domains. The program is written also in plain text but a compiler translates it into machine instructions in an executable file in compilation time and it’s that executable file that runs on its own in runtime.

The two languages support Object Oriented Programming paradigm.

One remarkable difference between the two is that C++ can be many fold faster than PHP in the same domain. This doesn’t come free, on the other hand it’s much quicker to program and get something functional in PHP.

PHP is easier to program and to debug and there is no compilation time whereas C++ is all the opposite.

There are scenarios where it’s more convenient to invest time in development to get the most of the machine for various reasons like we have high workloads or because we are getting charged for computing power so we want to reduce the overhead of interpreting the code.

But we don’t need to pick one or the other, we can have both working hand by hand.

If in a PHP development we identify bottle necks we can replace pieces of code for C++.

The way of doing this is by creating a PHP module with an interface that define PHP functions and classes which are actually implemented in C++.
This code will run at full speed in your CPU as it doesn’t need to be interpreted.

In this article I’m going to describe how to prepare the environment to do this in Windows.
I’m going to use XAMP 8.1.12 which brings PHP 8.1.16 64 bits Thread Safe, and Visual Studio 2022.

PHP 8.1.16 in windows is compiled with Visual C and the Platform Tool MSVC 14.29.
This platform tool MSVC 14.29 belongs to Visual Studio 2015 but it’s too old. Instead we are going to install MSVC 14.29 in our Visual Studio 2022. BTW this instructions may work in VS 2017 and VS 2019.

CONFIGURING THE ENVIRONMENT:

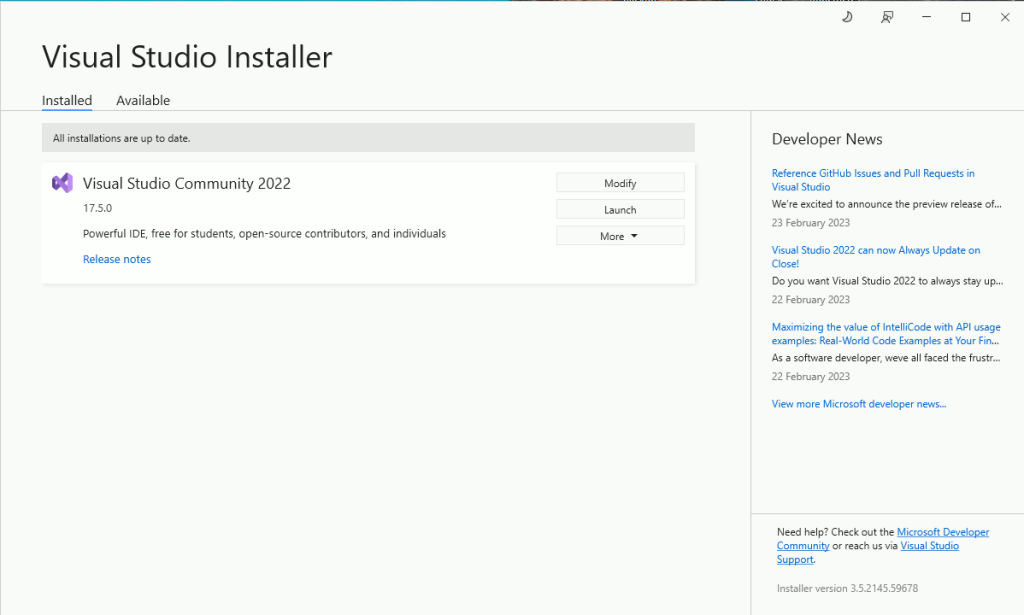
So we need to go to the Visual Studio Installer and click on Modify

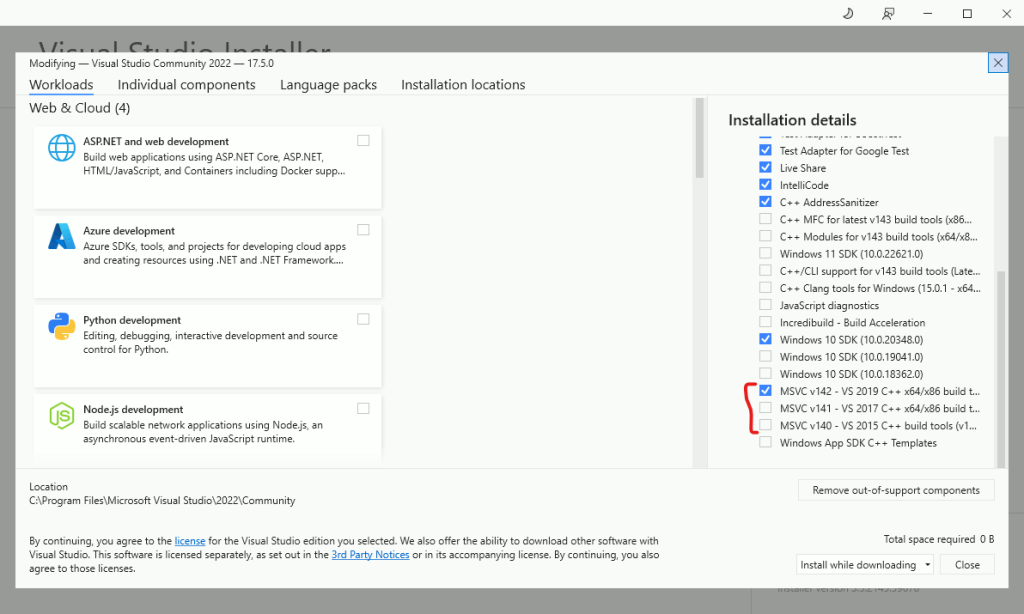
In the next window we can select one of those MSVCs. As I’m explaining on VS 2022 I’m selecting the highest which is the exact version PHP 8 is compiled with, MSVC 14.29.

We also need to download the headers of PHP.

In https://windows.php.net/download/ search for PHP 8.1 VS16 x64 Thread Safe whose link is this:
https://windows.php.net/downloads/releases/php-devel-pack-8.1.16-Win32-vs16-x64.zip

This zip contains the headers of many PHP libraries and the .lib files for linking in Visual Studio.
So you unzip it somewhere.

Now we create a Visual Studio project. We want a Dynamic library but we can start with an empty project.

In my examples I called the project MyPHPModule.

Now, we need to set the path to the libraries and the Platform Toolset.
We do right click on the project and go to properties.
We make sure that Configuration is set to All Configurations and Platform to x64.

In the Properties window we go to Configuration PropertiesGeneral and in it we set:

Configuration Type as Dynamic Library (.dll)
Platform Toolset as Visual Studio 2019 (v142)

And for the sake of convenience we’ll change the Output Directory for the path to the module folder in our php distribution. In my case it’s C:\xampp\php\ext. So that the library is built right where it’s available for use by PHP.

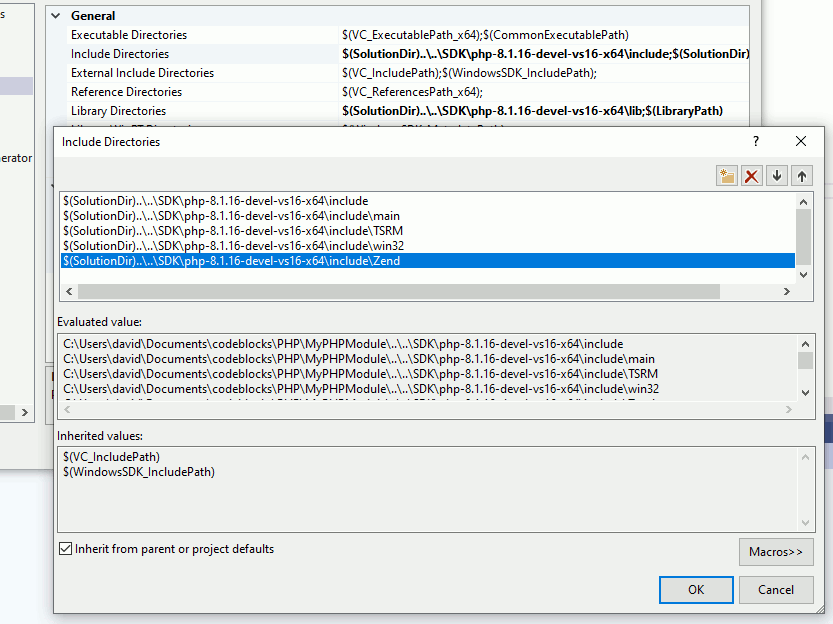
Now we move to Configuration PropertiesVC++ Directories and in the property Include Directories we set the paths:

php-8.1.16-devel-vs16-x64\include
php-8.1.16-devel-vs16-x64\include\main
php-8.1.16-devel-vs16-x64\include\TSRM
php-8.1.16-devel-vs16-x64\include\win32
php-8.1.16-devel-vs16-x64\include\Zend

Where php-8.1.16-devel-vs16-x64 is the folder were you unzipped the libraries, obviously you need to provide the path to that folder in those 5.

In the property Library Directories we do the same for the path to php-8.1.16-devel-vs16-x64\lib

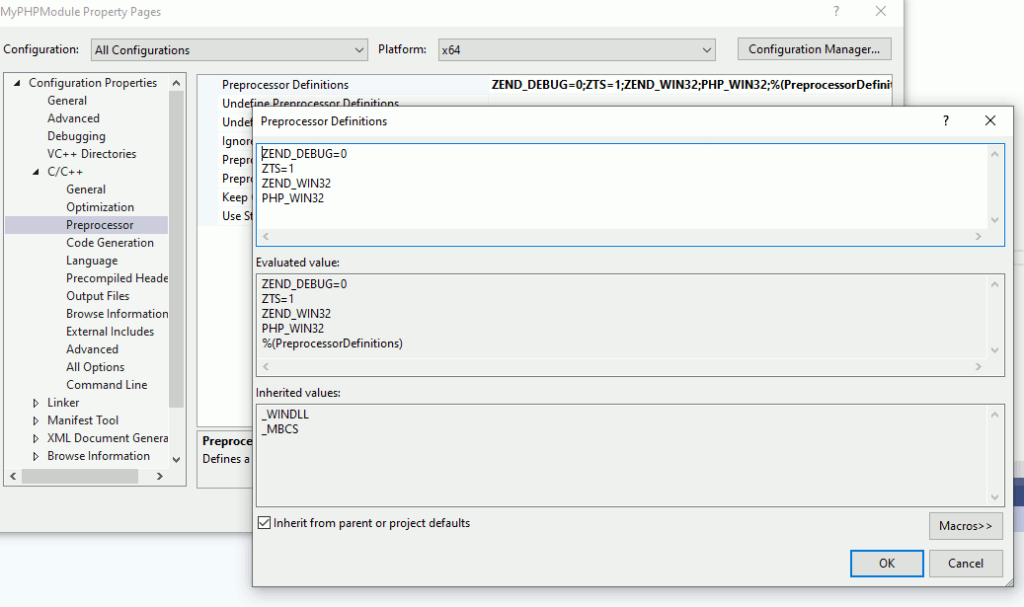
Now we move to Configuration PropertiesC/C++Preprocessor and in the property Preprocessor Definitions we set the following:

ZEND_DEBUG=0
ZTS=1
ZEND_WIN32
PHP_WIN32

This might be confusing at first. We are compiling for x64 platform but still we need to set the flags ZEND_WIN32 and PHP_WIN32 These _WIN32 only means Windows.

The last configuration now is to move to Configuration PropertiesLinker Input and in the property Additional Dependencies the value php8ts.lib.

Now we are good to go.

PROGRAMMING OUR FIRST MODULE

Now we are going to create a .cpp file. In my case the file MyPHPModule.cpp
My Module is going to have a function that prints “Hello World!!”, a function that takes two params and returns their multiplication, a function that counts up to a given number and a function that takes two arrays and returns an array with the sum of the two value by value.

We first include the PHP library:

#include <php.h>

Now we define the four functions:

PHP_FUNCTION(hello_world) {
	
	ZEND_PARSE_PARAMETERS_NONE();

	php_printf("Hello World!\n");

	RETURN_NULL();
}

PHP_FUNCTION(counting)
{
	zend_long n;

	ZEND_PARSE_PARAMETERS_START(1, 1)
		Z_PARAM_LONG(n)
	ZEND_PARSE_PARAMETERS_END();

	volatile zend_long count = 0;
	for (; count < n; count++);

	RETURN_LONG(count);
}

ZEND_FUNCTION(multiply)
{
	zend_long x, y;

	ZEND_PARSE_PARAMETERS_START(2, 2)
		Z_PARAM_LONG(x)
		Z_PARAM_LONG(y)
	ZEND_PARSE_PARAMETERS_END();

	RETURN_LONG(x * y);
}

PHP_FUNCTION(sum_arrays) {
	
	zval *arr1 = nullptr, *arr2 = nullptr;
	

	//we accept two params and the two are required
	ZEND_PARSE_PARAMETERS_START(2, 2)
		Z_PARAM_ARRAY(arr1) //the param 1 is an array
		Z_PARAM_ARRAY(arr2) //the param 2 is an array
	ZEND_PARSE_PARAMETERS_END();

	std::size_t arr1c = 0, arr2c = 0;
	arr1c = zend_array_count(Z_ARR_P(arr1));
	arr2c = zend_array_count(Z_ARR_P(arr2));

	zend_array *za1 = nullptr, *za2 = nullptr;
	std::size_t siz;

	//if the arra1 is longer than the arra2
	if (arr1c > arr2c) {
		za1 = Z_ARR(*arr1);
		za2 = Z_ARR(*arr2);
		siz = arr2c;
	}
	//if the arra2 is longer than the arra1
	else {
		za1 = Z_ARR(*arr2);
		za2 = Z_ARR(*arr1);
		siz = arr1c;
	}

	//we go through the array
	for (std::size_t index = 0; index < siz; index++) {
		//add the element of arr2 to arra1
		Z_LVAL_P(zend_hash_index_find(za1, index)) += Z_LVAL_P(zend_hash_index_find(za2, index));
	}

	//we return the arra1 with the values added.
	RETVAL_ARR(za1);
}

As you may have noticed we use macros to declare the functions and it’s inside the functions that we extract the parameters with the macros ZEND_PARSE_PARAMETERS_* and Z_PARAM_*.
ZEND_PARSE_PARAMETERS_START accepts two parameters, the first one is minimum number of parameters the function receives, the compulsory ones, and the second number is the max number of params.

It’s not like function prototypes in C or C++. This is because these functions are actually entry points to the module. Parameters and return value enter and leave the module through these functions declared this way. We can either implement the functionality right there or inside another functions called from them.

The prototype of those functions are expressed this way.

//prototype of function hello_world;
ZEND_BEGIN_ARG_INFO(arginfo_hello_world, 0)
ZEND_END_ARG_INFO()

//prototype of function counting;
ZEND_BEGIN_ARG_INFO(arginfo_counting, 0)
	ZEND_ARG_INFO(0, n)
ZEND_END_ARG_INFO()

//prototype of function multiply;
ZEND_BEGIN_ARG_INFO(arginfo_multiply, 0)
	ZEND_ARG_INFO(0, x)
	ZEND_ARG_INFO(0, y)
ZEND_END_ARG_INFO()

//prototype of function sum_arrays;
ZEND_BEGIN_ARG_INFO(arginfo_sum_arrays, 0)
	ZEND_ARG_ARRAY_INFO(0, arr1, 0)
	ZEND_ARG_ARRAY_INFO(0, arr2, 0)
ZEND_END_ARG_INFO()

The macro ZEND_BEGIN_ARG_INFO start variables called arginfo_ and the macro ZEND_ARG_INFO declares each parameter, whether by ref or by value, the name and whether accepts null.

In the following peace of code we gather all the functions and their definitions:

static zend_function_entry hello_world_functions[] = {

	PHP_FE(hello_world, arginfo_hello_world)
	PHP_FE(counting, arginfo_counting)
	PHP_FE(multiply, arginfo_multiply)
	PHP_FE(sum_arrays, arginfo_sum_arrays)
	PHP_FE_END
};

As you can see it’s an array and with the macro PHP_FE we link the function with its arginfo_<function>

We can declared some standard callbacks like PHP_MINFO_FUNCTION:

PHP_MINFO_FUNCTION(hello_world)
{
	php_info_print_table_start();
	php_info_print_table_header(2, "Hello World Module", "enabled");
	php_info_print_table_row(2, "Some parameter", "Some value");
	php_info_print_table_end();
}

which is used to print details about the module when running a phpinfo().

Finally we can put all together with this other structure:


/* Define the module entry */
extern zend_module_entry  hello_world_module_entry = {
	STANDARD_MODULE_HEADER,
	"hello_world",			/* Extension name */
	hello_world_functions,		/* zend_function_entry */
	NULL,				/* PHP_MINIT - Module initialization */
	NULL,				/* PHP_MSHUTDOWN - Module shutdown */
	NULL,				/* PHP_RINIT - Request initialization */
	NULL,				/* PHP_RSHUTDOWN - Request shutdown */
	PHP_MINFO(hello_world),		/* PHP_MINFO - Module info (PHP Info) */
	"1.0",				/* Version */
	STANDARD_MODULE_PROPERTIES
};

And register the module:

ZEND_GET_MODULE(hello_world)

CONFIGURING PHP

Assuming that the module gets compiled in the folder for modules, in my case C:\xampp\php\ext so it’s there, we just need to open the php.ini, in my case in the path C:\xampp\php and add the line:

extension=MyPHPModule.dll

Now, we can test whether the module is there with the next command in command line:

php -m | findstr  hello_world

If present we’ll get hello_world

Another test we can do is to make a .php file with a phpinfo() call:

<?php
phpinfo();

and with the browser explore that file. In my local server is the url http://localhost/MyPHPModule/

PHP will show the details we set in the callback function PHP_MINFO_FUNCTION

If we see either of them the module is correctly set up and we are ready to use in PHP.

PHP TESTS

We can now create a .php file and call the four functions we implemented in C++.

We can start with this little script:

<?php
echo '<pre>';
hello_world();

If we run it with the browser we get a Hello World!

Let’s now try the following test:

 $times = 100000;

$milliseconds = floor(microtime(true) * 1000);

//loop that only counts
for($n = 0; $n < $times ; $n++){
	;
}

$milliseconds = floor(microtime(true) * 1000) - $milliseconds;

echo "PHP loop took milliseconds: $milliseconds\n";

We are going to compare the performance of just counting.
We set the number of times we want to count in the var $times.

Then we capture the timestamp and right after we have a for loop.

After the for loop we get the time again and subtract the time we previously took so that we have the time it took to run the for loop.

Now we can do the same with our function counting():

$milliseconds = floor(microtime(true) * 1000);

//calling our counting function
$count = counting($times);

$milliseconds = floor(microtime(true) * 1000) - $milliseconds;

echo "Our module's loop took milliseconds: $milliseconds\n";

When racing one against the other you will get such result as this:

PHP loop took milliseconds: 7
Our module's loop took milliseconds: 0

you can try with bigger numbers.

The next bit is to test the multiply() function:

//testing our multiply function.
echo '3 * 3 = ' . multiply(3,3) . PHP_EOL;

This function doesn’t actually pose any improvement in performance. It’s just a demonstration of a function that accepts params and returns results.

The last test is our sum_arrays function:

//the first array contains numbers from 0 through 10
$arr = range(0, 10);

//the second array only then 1s
$arr2 = array_fill(0, 10, 1);

//we sum the values of the first and second arrays into a third array;
$arr3 = sum_arrays($arr, $arr2);

print_r($arr3);

In this tests we create two arrays, one has numbers from 0 to 10 and the other only 1s.
The function sums one array to the other element by element.

The this function is nearly 20 times faster than its counterpart in PHP.
We can make it even faster if our module was capable to send those arrays to the GPU and parallelize the calculation.

You can see the potential that moving PHP parts into C++ has.

I hope you enjoy this tutorial.
The rule of five

C++ supports Object Oriented Programming which means that you can express entities with classes and structures (struct) and make instances of them.

These classes group the operations available to work with the data the classes and structs encapsulate.

In a class, data is represented by members which are fields that contain data expressed in their data types and member functions which are the operations on that data.

Classes get constructed and destroy. If the Class is not complex, it only has fields of primitive types and it doesn’t allocate memory in the heap, C++ provides us with implicit constructors and destructors.

These constructors and destructors are methods that are run on construction and destruction respectively.

These methods constructor and destructor are special member functions that call just like the class and in the case of the destructor it’s preceded by the tilde character.

If we ever need to implement one of these methods we must know that we can implement many different constructors but only one destructor.

Constructors can have parameters or not have them at all.

There are 3 types of constructors though.

The first type is a constructor to create an instance out of parameters or without them.

class MyClass
{
public:
	MyClass(){/* your implementation */}

	MyClass(int param1, int param2){/* your implementation */}
}

MyClass my_object(1, 2);

A Second type of constructor is called copy constructor.

class MyClass
{
public:
	MyClass(const MyClass& inst){/* your implementation */}
}

MyClass my_object;


MyClass another_object(my_object);

This is a special type which accepts as only parameter an instance of the same type and it’s mean to copy that object into the object we are instantiating.

The third type is the move constructor.

class MyClass
{
public:
	MyClass(MyClass&& inst){/* your implementation */}
}

MyClass my_object;


MyClass another_object(std::move(my_object));

It’s similar to the copy constructor, it accepts an instance of the same class as only parameter but it uses move semantics and it’s meant to fetch the resources of the instance given and leave it in an empty status.

There are another two special operations or rather operators. One is the copy assignment and the other the move assignment.

Copy assignment is meant to copy the data of an object in an existing object.

class MyClass
{
public:
	MyClass& operator = (const MyClass &) {/* your implementation */}
}

MyClass my_object,  another_object;

my_object = another_object;

Move assignment is like copy, it copies the data of an object in an existing object but it leaves the original object in an empty status.

class MyClass
{

public:
	MyClass& operator = (Class &&) {/* your implementation */}
}

MyClass my_object,  another_object;

my_object = std::move(another_object);

If C++ provides these 5 operations why would we need to have our own?

If you have an object with pointers and you don’t define a copy constructor C++ is going to provide the default copy constructor which only does shallow copies.

A shallow copy is that it will copy the pointers but not the buffers or objects those pointers point to, therefore the new and the old object point to the same resources, and when one of the two instances gets destroyed, most probably it’s going to release those resources and now the other object is going to be pointed unallocated memory.

In that case you need to define your copy constructor and manually copy those resources.

Also if your object holds resources, you need to tell C++ how to release them at the end of life of the object, otherwise they will remain locked and unaccessible and we don’t want that.

Based on the above discussion on what a copy constructor, move constructor, copy assignation, move assignation and destructor are, I’m going to explain the rule of 5.

The rule of 5 dictates that if you need to implement one of the 5 operations, you need to implement the 5 of them.

This is because if you need a destructor because you need to manually release resources, if you copy or move the object you also need to do something about.

Another option is to delete those operations so that you prevent an object from being copied or moved.

class MyClass
{
public:
	MyClass(int param1, int param2){/* your implementation */}

	MyClass(const MyClass& inst) = delete; // deletion of the copy constructor
	MyClass& operator =(const MyClass &) = delete; // deletion of the copy assignment
	MyClass(MyClass&& inst) = delete; // deletion of the move constructor
	MyClass& operator =(MyClass&&) = delete; // deletion of the move assignment
	
	~ MyClass() {/* your implementation */}
}

The point is that you don’t leave the default operation in effect but a customized one or deleted.

I hope it helps.

Recompiling Qt’s driver for MySQL and for MinGW64

I’m currently working on some project developed with the Qt framework.

In this project I need to connect to a MySQL database, but Qt doesn’t include the libraries for licensing problems, so you need to compile them yourself.

In the Qt documentation is told how to do it but I found it inaccurate, and I had to do lots of research to manage and here is how I did it.

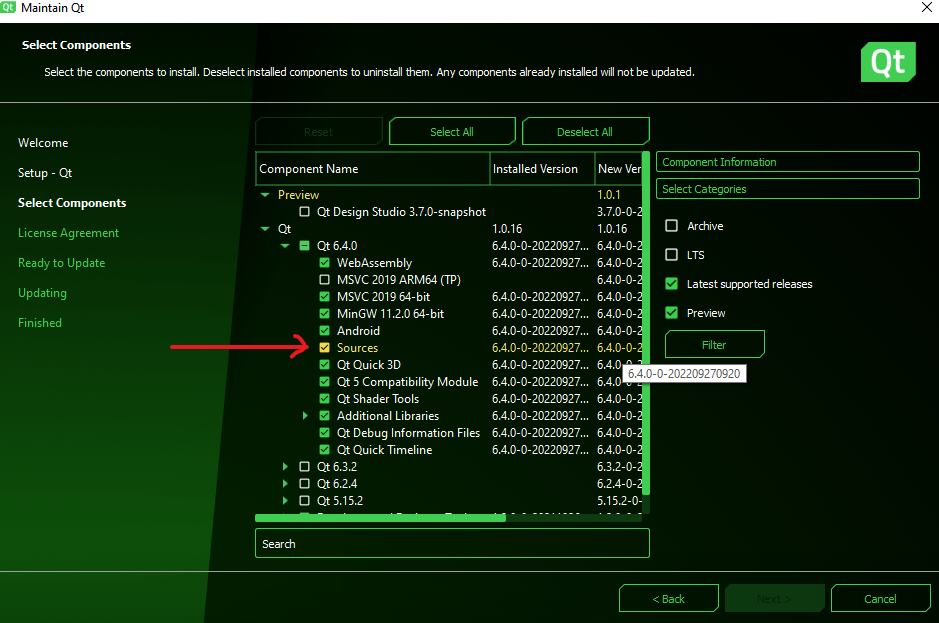
I have Qt in the path C:\Qt and the version 6.4.0. you may have other versions though. There are the versions 6.3.2, 6.2.4 or even 5.15.2.
Of whatever version you might have you need also the sources.

In my case the sources are in C:\Qt\6.4.0\Src\

you will also need to download the mysql-connector-c.6.1.11 from https://downloads.mysql.com/archives/c-c/?version=6.1.11&amp;os=src

In the Qt’s documentation they use mysql-8.0.22-winx64. In my example I choose mysql-connector-c-6.1.11-winx64. You can pick the 32 or 64 versions.

It’s important that you download the zip file, and you unzip it in a path without spaces. In my case the path is C:\mysql-connector-c-6.1.11-winx64

If you installed it from the .msi it won’t probably work because it’s in C:\Program Files\MySQL\MySQL Connector C 6.1 which contains spaces.

Now you can go to C:\Qt\6.4.0\Src\qtbase\src\plugins\sqldrivers and create a building folder and configure, build and install the drivers with the following commands:

cd C:\Qt\6.4.0\Src\qtbase\src\plugins\sqldrivers
mkdir build-sqldrivers
cd build-sqldrivers
qt-cmake ^
	-D CMAKE_MAKE_PROGRAM="C:\Qt\Tools\Ninja\ninja.exe" ^
	-G Ninja C:\Qt\6.4.0\Src\qtbase\src\plugins\sqldrivers ^
	-D CMAKE_INSTALL_PREFIX="C:\Qt\6.4.0\mingw_64" ^
	-D MySQL_INCLUDE_DIR="C:\mysql-connector-c-6.1.11-winx64\include" ^
	-D MySQL_LIBRARY="C:\mysql-connector-c-6.1.11-winx64\lib\libmysql.lib"

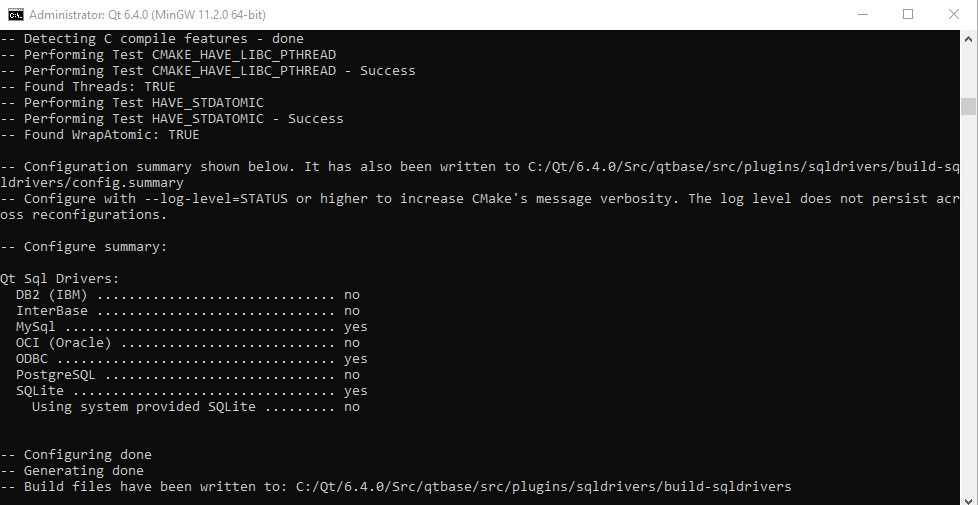
If all goes well, you will see this screen:

Then you just need to run these two commands:

cmake --build .
cmake --install .

Obviously, you need to set your own paths.

The Qt documentation doesn’t seem to include the param
-D MAKE_MAKE_PROGRAM=”C:\Qt\Tools\Ninja\ninja.exe“.
This is key because otherwise it won’t find the Ninja program.

Once this is done, you need to do something else and that is to copy the file C:\mysql-connector-c-6.1.11-winx64\lib\libmysql.dll either in the folder where you generate your exe or in the path C:\Qt\6.4.0\mingw_64\bin

Also, you need to distribute your app along this file.

I hope it helps.

How to install GLUT in Windows 10.

I was following a tutorial on OpenGL based in GLUT which is an auxiliary library created by Mark Kilgard to create a window in an easy way so that one can focus in learning OpenGL.

GLUT can be found at the URL http://opengl.org/resources/libraries/glut/glut_downloads.php

The problem is that GLUT has been abandoned and the last version runs on Windows XP and it isn’t an open source project either so no one can develop it on.

Fortunately Pawel W. Olszta, Andreas Umbach and Steve Baker developed an Open Source alternative called Free GLUT which is compatible with GLUT and replaces it in modern operating systems.

In this article I’m going to explain how to install it in Code::Blocks and on Windows 10.

The project is hosted at this URL: http://freeglut.sourceforge.net/ where you can download the sources and compile them yourself but it also links to Martin Payne’s web where the library is already compiled and available for MinGW which is Code::Block’s compiler or for Microsoft Visual Studio.

The URL of Martin Payne for the compiled library is https://www.transmissionzero.co.uk/software/freeglut-devel/

We click on the link Download freeglut 3.0.0 for MinGW, it’s a zip file which contains a folder called freeglut. I unzipped it in the path C:\freeglut

At this point you can create a project in Code::Blocks and manually add the pats to the folders include and lib plus the linker flags.

In order to do that we click the right button of the mouse on the project and in the menu we select Build Options… This will open a window.

In this window, in the profile Debug move onto the the tab Search directories and search for the sub tab compiler. In it enter the path C:\freeglut\include

Now move onto the sub tab Linker and add the path to C:\freeglut\lib\x64

Afterwards go to the tab Linker settings which is next to Search directories and inside it there is a vertical textbox titled Other linker Options: and enter the flags: -lfreeglut -lopengl32 -lglu32

To compile in Release you need to do the same setting as for Debug.

Lastly you need to copy the file C:\freeglut\bin\x64\freeglut.dll in the folder with the executable file that it’s created in the paths bin\Debug or bin\Release in your project.

At this stage you can now compile your OpenGL program making use of the auxiliary library FreeGLUT.

You’ll need to do the same configuration every time you start a new project but it doesn’t have to be so.

Code::Blocks has a template out of the box to create GLUT project but this template is broken because it’s designed to do it with the original library which as I said it won’t work in Windows 10.

What we need to do however is to make some changes to generate project that use FreeGLUT.

In order to do that we need fist to edit the file C:\Program Files\CodeBlocks\share\CodeBlocks\templates\glut.cbp with Notepad or any other text editor and replace any occurrence of the word glut32 for freeglut.

Then we go to the file C:\Program Files\CodeBlocks\share\CodeBlocks\templates\wizard\glut\wizard.script and also there we replace all the occurrences of glut32 for freeglut.

Now, if when creating a new project we select GLUT, a wizard will pop up asking things like the project name and the path.

Then it will ask the path to the GLUT library. Here you need to provide the path to the folder C:\freeglut and then finish creating the project.

This Wizard will create a demonstration project which you can compile and run.

I hope you find this tutorial useful.

Google Test with Eclipse and MinGW-W64 from scratch

I was researching how to make unit tests in C++ due to an online course about Google Test.
In the process of installing the environment I found a number of challenges that I had to overcome beyond of what the course taught and I decided that I would be matter for an article.

In this article I’m going to describe how to install Google Test in Eclipse CDT, Git, CMake and MinGW-W64 in Windows from scratch.

Installing Eclipse:

Eclipse is an open source integrated development environment. It’s got a lots of modules to make it suitable to develop in languages like Java, PHP, and many more and of course for C++.

The Eclipse for C++ is called Eclipse CDT which means C/C++ Development Tooling.

One way to obtain CDT is by installing the plug in upon a plain Eclipse.

Eclipse with CDT is also available for download at https://www.eclipse.org/downloads/packages/release/2022-06/r/eclipse-ide-cc-developers

In the download links place you can find the ones for Windows, Linux and Mac OS.

The one I downloaded at the time of this article was: https://www.eclipse.org/downloads/download.php?file=/technology/epp/downloads/release/2022-06/R/eclipse-cpp-2022-06-R-win32-x86_64.zip

You can unzip it wherever you want.

Installing MinGW-W64.

Eclipse on its own it not more than a very sophisticated notepad. It doesn’t include any compiler but it uses any compiler you may have. It could be the one of Visual C, or Clang or like in our case MinGW-W64.

MinGW-W64 is one of several GCC distributions for Windows like Cygwin or MSY2.

The MinGW project is hosted at https://sourceforge.net/projects/mingw-w64/

There is an install wizard with which you can select some aspects like the architectures x86_64 or i686 (64 or 32 bits respectively), or whether whether you want it to simulate the posix interface of the Unix-like operating systems or win32 straight away, and to choose between sjlj, seh and dwarf.
These last three are standards that have to do with the way you want to deal with exceptions but I don’t understand it yet.

Well, the Installer doesn’t work so don’t download it. Instead you want to go to the files section and there you’ll see all the versions available.

As I don’t understand much about the versions available I only download the one I have seen more common and that is x86_64, posix, and she, version 8.1.0 at the moment of this article.

Here is the link to that file: https://sourceforge.net/projects/mingw-w64/files/Toolchains%20targetting%20Win64/Personal%20Builds/mingw-builds/8.1.0/threads-posix/seh/x86_64-8.1.0-release-posix-seh-rt_v6-rev0.7z

We unzip the file. Normally this goes in C:\mingw64 but you can place it wherever you want. Only remember the path.

Inside the folder there is the folder bin. You have to add that folder C:\mingw64\bin in the Windows environment var called PATH so that the executables are all available.

Once added you can go to the command line with Win+R and type cmd and in the console type gcc -v and check that GCC is now available.

Installing CMake

Another tool we need in order to install Google Test is CMake.

When a C or C++ program has more files than the main.c file it is necessary a tool to automatically compile without having to type all the commands and their libraries.

For this purposes the tool Make was invented and is included in almost all compilers.

This tool reads from a file called Makefile where it’s all the instructions to compile your project.

The problem came when projects had to be multiplatform and they had to have different Makefiles for each.

o solve that problem another tool was invented call Configure which automatically assessed your system and what dependences it satisfied and created a tailored Makefile for it which could be used with the Make command.

The problem with this tool is that it’s so versatile and complex that sometimes it’s set up is larger and more complex than the project that we’re trying to compile. Because of this we now have CMake.

CMake is therefore to create the Makefile but in an easy way and it’s the last trend.

CMake is available to download at https://cmake.org/download/ and it’s got an installer in Windows.

When you install it you have to add the path of its executables in the PATH. Presumably in C:\Program Files\CMake\bin

In the command line like we did before we can check that it’s been installed correctly by running the command:

cmake -version

Installing Git

The Google Test project is hosted at github.org and in order to download it we need the program Git which is a control version source software. it’s the most popular.

You can find it at https://git-scm.com/downloads

Once installed, in the command line you can check whether it installed correctly with this command:

git --version

Compiling Google Test

Now we can download the Google Test sources and compile it although it won’t be the last stage in this journey.

You need to find a place to download Google Test. If you opened the Eclipse it probably created a folder in the path: C:\Users\your user\eclipse-workspace. This is a good place to go.
In the folder you choose you have to run the following command:

git clone https://github.com/google/googletest.git

This downloads the source code of Google Test inside the folder googletest therefore let’s go in:

cd googletest

Then we create a fonder inside where we are going to compile the library.
We may use the shell commands like mkdir but CMake provides a shell agnostic command to do it in any operating system.

cmake -E make_directory mingw_build

Now we are going to make use of CMake to compile the project but we aren’t going to run the plain command because by default it will build a project to be compiled by Visual C. Instead we have to pass a number of parameters to tell it to compile with MinGW-W64 therefore we run the following commands:

cmake -E chdir mingw_build cmake -G "MinGW Makefiles" -D CMAKE_C_COMPILER=gcc.exe -D CMAKE_CXX_COMPILER=g++.exe -D CMAKE_MAKE_PROGRAM=mingw32-make.exe ..

The first part tells CMake to work inside the folder mingw_build and to create a project suitable to be compile with MinGW-W64.

Now we build it and installing with this two commands also shell agnostic.

cmake --build mingw_build
cmake --install mingw_build

For the command install you may need Admin privileges because it’s going to install it inside the folder C:/Program Files (x86)

After a while it will have compiled and will be ready to use in our project.

Setting up Eclipse for unit tests.

Eclipse has a plug in with which automatize unit test so let’s install it.
Up in the tool bar, Help, in the option menu we click on Install New Software… A dialogue window opens.
There is a drop down named Working with: Select the repository: 2022-03 – https://download.eclipse.org/releases/2022-03 which is true at the moment of this article.

There is a try underneath, we go to Programming Languages and inside it, C/C++ Unit Testing Support.

This for now, later we will configure our project with it.

Creating a project.

Now we create a new project so we go File → New → C/C++ Project. This opens up a window.

I’d suggest to create it of the type C++ Managed Build. This means that Eclipse is responsible to compile and link automatically.

In the next page in the window we give the project a name and in Project Type we can chose Hello World C++ Project. In the list next to it we can see the toolchains available. We chose MinGW GCC.

Now we should have a project with a sample code with the obligated Hello World.

Now, In the project list of the Project Explorer we click with the right button of the mouse and from the option menu we select properties and a window opens up.

In this window there is a tree on the left side. We go to C/C++ General → Paths and Symbols.
On the right hand of the tree there are several tabs.

We move onto the tab Includes and in the languages list we select GNU C++ and on the right side of it we click on add…

Another dialogue opens up. We now click on File system… and look for a the folder include of Google Test. It would be like this: C:/Program Files (x86)/googletest-distribution/include

Now we move onto the tab Library Paths and in the same way we click on add… In the next dialogue we click on File System… as we did earlier but now we’re looking for the folder C:/Program Files (x86)/googletest-distribution/lib/

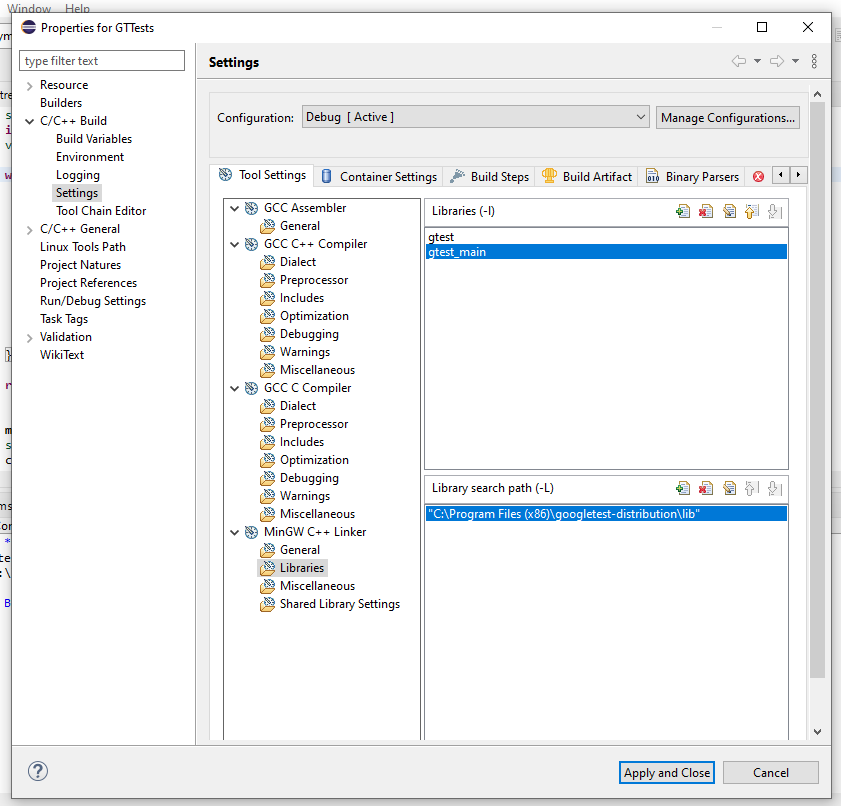
Finally we go back to the property tree to C/C++ Build → Settings and in the tab Tool Settings there is another tree. We move onto MinGW C++ Linker → Libraries and on the right side will see two lists, one empty and the other with the path to C:\Program Files (x86)\googletest-distribution\lib that we previously entered.

In the empty list we need to add library twice, and enter gtest and gtest_main as in the image:

Now our project can compile linking the Google Test library.

Adding the test runner.

Now we add the test runner which is for using the unit test plug in that we installed earlier to our Eclipse.

In order to do that we search the tool bar for the button run, but the one with the little arrow pointing down. A menu opens up and from it we click on Run Configurations…
This opens a new window with a tree on the left. In this tree we look for C/C++ unit and with it selected we click the button new on the top of the tree and this will create a new node beneath C/C++ unit.

On the right of the tree we have the name of the test runner.
We can change it if we want. I called mine GTTests Unit Tests.

Bellow it, we have several tabs. let’s go to C/C++ Testing. Here we find a very simple for. it’s got a drop down named Test Runner. We select Google Tests Runner.

Testing it all.

At this point we have everything set up and ready to test that it works.
We go back to our code. We can delete it all and replace it with this other:

#include <iostream>
#include <gtest/gtest.h>

TEST(FooTest, tests_foo){
	ASSERT_TRUE(true);
}

Now we click on the button compile, the one with the hammer.
To run it we can click run.
This renders an output in the console that tells us that it has passed the test, because the test is designed to be passed.
But this is the output that we get when we run the executable as it is.

As now we have a test runner we can select it in the drop down menu beside, in my case I called it GTTests Unit Tests. And now we click on run.
Now what we see is the runner instead of the console with the details in a more friendly format.

Up till now this article. In next articles we’ll immerse ourselves in doing units tests.

X68000 Programming chapter 4.1, File operations.

Many times when we make a program we need to read or right files external to our program.
In the context of a video game it may be an image, a tile map or a PCM.
We may also nee to write in disk a log or save a game.

In X68000 we can utilise the <stdio.h> library a like we would in other operating system and that’s it, but the Human68k OS has its own set of functions to manage files.

Why should we use this functions when we have <stdio.h>? In nfg.forums there is this entry of Lyndux commenting about writing drivers for X68000. https://nfggames.com/forum2/index.php?topic=5417.0 and apparently in early stages of the operating system’s bootstrap Libc isn’t fully available yet, therefore in this scenario the most reliable is to use these functions instead of <stdio.h> ’s.

It’s also in order to preserve this knowledge that I make this post explaining it all.

In this article I’m going to talk about these functions:

int _dos_create (const char *file, int attr)

int _dos_newfile (const char *file, int attr)

int _dos_maketmp (const char *file, int attr)

int _dos_open (const char *file, int mode)

int _dos_read (int fno, char *buffer, int size)

int _dos_write (int fno, const char *buffer, int size)

long _dos_seek (int fno, int offset, int mode)

int _dos_close (int fno)

int _dos_delete (const char *file)

All of them belong to the <doslib.h> should we use Mariko or <dos.h> if Lydux toolchain.

Create a file:

int _dos_create (const char *file, int attr)

int _dos_newfile (const char *file, int attr)

int _dos_maketmp (const char *file, int attr)

In <stdio.h> we would use FILE *fopen(const char *filename, const char *mode) whether to open a file as well as to create it. Moreover fopen() will give us a pointer to the handler of the file we just opened or created which will be used with other functions.

In Human68k we have 3 different functions to create files and even directories; these are _dos_create(), _dos_newfile(), and _dos_maketmp().
Plus another function only to open an existing file with _dos_open().
These functions return an integer number that the operating system assign to the file and it comes to be like the file handler. If the file can’t be opened or created, the number returned will be negative and represents an error code.

The three functions to create a file have a string of characters with the file name as first param, then an integer number as a second param.

The integer we pass as a second param is a byte of flags in which each bit has a meaning.

According to this post https://www.target-earth.net/wiki/doku.php?id=blog:x68_devcode the bits signify this:

000: read and write, 1: R – read only
010: visible, 1: H – hidden
020: normal, 1: S – system file
030: not a volume, 1: V – Volume name
040: not a directory, 1: D – directory name
050: not an archive, 1: A – archive name.
06 – 15The other bits are ignored.

The letters R, H, S, V, D, A are attributes that can be seen with the command ATTRIB <file name> in the command line.

To ease things we can create the following macros:

#define F_ATTR_  0x00  //0b000000 //0 read and write mode and A attribute (default)
#define F_ATTR_R 0x01  //0b000001 //1 read only
#define F_ATTR_H 0x02  //0b000010 //2 Hidden
#define F_ATTR_S 0x04  //0b000100 //4 System file
#define F_ATTR_V 0x08  //0b001000 //8 Volume name
#define F_ATTR_D 0x10  //0b010000 //16 Directory name
#define F_ATTR_A 0x20  //0b100000 //32 Archive name

The three functions create files but with different shades:

int _dos_create (const char *file, int attr)If the file exists it can override it if bit 0 is 0
int _dos_newfile (const char *file, int attr)If the file exists it won’t override it.
int _dos_maketmp (const char *file, int attr)If the file exists it will override it.

Then creating a file looks like this.

//We create a file and open it so we get its number to manage it.
file_number = _dos_create(
    "file", //file name
    F_ATTR_       //read and write mode and A attribute
);

//if any error...
if(file_number < 0) {
    _dos_c_print("Can't create the file\r\n");
}

The function _dos_create() has the file name as its first param and byte of flags as the second param.

Opening a file: int _dos_open (const char *file, int mode)

The function _dos_open() also have the file name as its first param and an integer of flags as the second in which each bit has a meaning.

In X68000, as we saw earlier there are many functions which instead of having a parameter for each aspect of the configuration they use an integer of flags.

In order to ease the use of the function we can build a macro or a bit-field structure.

The meaning of each bit is as follows:

Bits 0 -1 opening mode00: write only. 01: read only. 11: read and write.
Bits 2, 3 y 4, permissions to share with other processes whilst open000: default mode. 001: no one else has access to it. 010: allow read only to other processes. 011: allow write only to other processes. 100: read and write to other processes.
Bit 70: as a normal file, 1: as a dictionary (whatever this is)

To better manage these flags we can declare these macros:

#define OPEN_ACCESS_DICTIONARY           0x80    //0b10000000 //1 not for users
#define OPEN_ACCESS_NORMAL               0x00    //0b00000000 //0

#define OPEN_SHARING_TOTAL               0x08    //0b00010000  //4 allow others to write and read
#define OPEN_SHARING_WRITE_ONLY          0x0C    //0b00001100  //3 allow others to write only
#define OPEN_SHARING_READ_ONLY           0x08    //0b00001000  //2 allow others to read only
#define OPEN_SHARING_RESTRICTED          0x04    //0b00000100  //1 don't allow others anything
#define OPEN_SHARING_COMPATIBILITY_MODE  0x00    //0b00000000  //0

#define OPEN_MODE_RW                     0x02    //0b00000010  //2 open for write and read
#define OPEN_MODE_W                      0x01    //0b00000001  //1 open only for writing
#define OPEN_MODE_R                      0x00    //0b00000000  //0 open only for reading

These macros have the bits calculated in hexadecimal already. It only leaves to use another macro to put them together.

#define OPENING_MODE(access, sharing, mode) (access | sharing | mode)

The code would be like this:

//now we open the same file and capture the handler number
file_number = _dos_open(
    "file",          //file name
    OPENING_MODE(
        OPEN_ACCESS_NORMAL,
        OPEN_SHARING_COMPATIBILITY_MODE,
        OPEN_MODE_R  //only read mode
    )
);

In this example we are opening the file “file” and with the macro OPENING_MODE and the three params we calculate the flags for the second params.

Reading from file: int _dos_read (int fno, char *buffer, int size)

To read from a file we use the function _dos_read() to which we pass the file number that we obtained with the functions _dos_create(), _dos_newfile(), _dos_maketmp() or _dos_open().
As a second param the pointer to a buffer and as a third param the number of bytes.
The function returns an integer number with the number of bytes that have been read. If the file is smaller than the number of bytes or we reached the end of the file, this number will be the bytes that it has been able to read.

The buffer has to be an array of char. Should we need to store data in a different format we have to do a casting.

//we read the file and capture the number of characters we manage to read
int16_t bytes_read = _dos_read(
    file_number,        //handler number
    (char *) buffer,    //destination
    sizeof buffer       //bytes to read
);

As it can be appreciated it’s very similar to the function fread() of <stdio.h>.

Writing in a file: int _dos_write (int fno, const char *buffer, int size)

To write in a file we use the function _dos_write() to which we pass the file number just like in _dos_read(), the buffer as a char array and the size in bytes.

//we write the message in the file
status = _dos_write (
    file_number,    //this is like the file handler in stdio but represented by an integer
    message,        //the message
    sizeof message  //the size of the message
);

If an error happened it will return a negative number indicating the type of error.

Moving around the file: long _dos_seek (int fno, int offset, int mode)

Similarly to <stdio.h>, Human68k provides us with a function to move the pointer of the file forwards, backwards or at any random place.
The function is _dos_seek() and accepts 3 parameters. The first param is the file number, the second is the offset and the third param is the point the offset is relative to.
This third param can be 0: beginning of the fila, 1: from the spot the pointer is currently in, 2: from the end of the file.

The function returns the byte number where the pointer is now on or a negative number it there was an error.

status = _dos_seek(
    file_handler,
    0, //offset
    2  //0 = beginning, 1 = on the spot, 2 = end
);

In this example we are moving the pointer to the end of the file to obtain the byte number at the end and so the size of the file.

Closing a file: int _dos_close (int fno)

Simply we close the file by passing the file number as a param.

//now we close the file
status = _dos_close(file_handler);

If no issues it will return 0, otherwise it will return a negative number indicating the error.

Deleting a file: int _dos_delete (const char *file)

To delete a file we use _dos_delete() with the file name as the only param.

//now we delete the file
status = _dos_delete("file");

We will get 0 if no issues or a negative number otherwise.

Errors:

As we’ve seen all the functions return either zero or a positive number indicating some detail of interest of no issues and a negative number if any error.
These negative numbers identify the error that happened and here is the list of errors:

-1 Executed invalid function code

-2 Specified file not found

-3 Specified directory not found

-4 Too many open files

-5 Cannot access directory or volume label

-6 Specified handle is not open

-7 Memory manager region was destroyed

-8 Not enough memory to execute

-9 Invalid memory manager pointer specified

-10 Illegal environment specified

-11 Abnormal executable file format

-12 Abnormal open access mode

-13 Error in selecting a filename

-14 Called with invalid parameter

-15 Error in selecting a drive

-16 Cannot remove current directory

-17 Cannot ioctrl device

-18 No more files found”; break;

-19 Cannot write to specified file

-20 Specified directory already registered

-21 Cannot delete because file exists

-22 Cannot name because file exists

-23 Cannot create file because disk is full

-24 Cannot create file because directory is full

-25 Cannot seek to specified location

-26 Specified supervisor mode with supervisor status on

-27 Thread with same name exists

-28 Interprocess communication buffer is write-protected

-29 Cannot start any more background processes

-32 Not enough lock regions

-33 Locked; cannot access

-34 Handler for specified drive is opened

-35 Symbolic link nest exceeded 16 steps (lndrv)

-80 File exists

In a next issue I will speak about functions to create directories, change attributes and make searches of files and directories.

X68000 Programming chapter 3, Anatomy of a program

In this article I’m going to explain the structure I use in my X68000 programs.

I normally declare several variables and a series of functions before the main() function which I implement afterwards and are to interact with the computer.

If you read the two previous articles, we can work with two different toolchains, Lydux’s and Jason Stevens’ based on MARIKO which is the original.

As the two toolchains use different header names and Lydux doesn’t have an alias for interruptions I do therefore two branches of compilation with the pre processor which checks whether __MARIKO_CC__ is declared.

#ifdef __MARIKO_CC__
    #include <doslib.h>
    #include <iocslib.h>
#else
    #include <dos.h>
    #include <iocs.h>
    #define interrupt __attribute__ ((interrupt_handler))
#endif

Then, depending on whether we compile with one or the other we use some headers or the others and we declare the interruption alias.

I also include these two libraries:

#include <stdio.h>
#include <signal.h>

The first one is the ever stdio.h which declares constants like NULL and with which we can do standard stuff.

The second library is signal.h for capturing events like pressing Ctrl+C keys to end the program and take us back to the operating system. In this way we can free resources and close the program in a clean manner.

It’s important to do this because we could have changed the screen mode and if we just come out the program, when we are back to Human68k the video mode remains the same and we have to restart the computer.

Then I declare these two variables:

char last_mode;

volatile int _timer = 0;

The variable last_mode is to capture the video mode there was when the program started so that should we change the video mode we can restore it.

The variable _timer is to set up a timer we can use to measure time.
It has to be volatile to prevent the compiler from eliminate it when optimizing the program because it doesn’t understand how we use it.

Then I declare a number of interruptions. For those who don’t know what an interruption is, an Interruption is a function that we attach to an event of the operating system in order to run certain code we want when the event happens.
These interruptions are:

void interrupt timer();         // for timing

void interrupt vsync_disp();    // for vertical sync

void interrupt hsyncst();       // for horizontal sync

void interrupt crtcras();       // for raster sync

The interruption timer() can be attached to the system timer for which we set the frequency it has to be called with and we can do an increment on the variable _timer.

This interruption looks like this:

void interrupt timer()
{
    ++_timer;
}

The interruption vsync_disp can be attached to the vertical synchronization event. This event happens every time the X68000 is going to draw the screen. It can be use to synchronize the program with the screen refresh. This event happens 60 times per second.

The interruption hsyncst is similar to vsync_disp but it triggers every time the X68000 is going to draw a horizontal line. This is that if there are some 512 lines and the screen is drawn 60 times per second, this event is called around 31000 times per second.

It can be used to make special effects with the scan line like changing the palette as the screen is drawn or change sprites position so that it looks there are more sprites.
The code in this interruption has to be extremely fast and optimized otherwise it will never finish running as it gets called again and again before it ends and the computer will block.

The interruption crtcras is like hsyncst but it only triggers when the scan line is on certain line we set before hand.
As it doesn’t get triggered on each line but only in the one we want we have more time to do things than with hsyncst. We can even set the next line we want to trigger it on in the same photogram if we want to.

It’s important that if these interruptions use global variables they are declared volatile.

This is because interruptions aren’t functions called by our program but by the operating system and the compiler doesn’t understand the context in which they access the variables and its optimizations might generate assembly code that don’t use them altogether so that they simply won’t work.

I’ll make an article explaining interrupts more in depth. It’s just that it’s good to know that they exist.

After the interruptions I declare these to functions:

void init();
void terminate();

The function init() is for initializing stuff. For example it’s the function were I capture the screen mode with the command:

last_mode = _iocs_crtmod(-1);   //capture the video mode before the program

Then I usually deactivate the command line cursor:

_iocs_b_curoff(); //disable the cursor

I clear the screen. This isn’t necessary when changing resolution:

_iocs_b_clr_al(); //clear the whole screen

Here I also set up the timer interrupt:

 _iocs_timerdst(
	timer,  //Processing address (interrupt disabled at 0)
	7,       //Unit time (1 = 1.0, 2 = 2.5, 3 = 4.0, 4 = 12.5, 5 = 16.0, 6 = 25.0, 7 = 50.0, micro sec unit)
	20       //Counter (when 0, treat as 256)
);

The first param is the interrupt name. The second is the time unit with it’s 50 microseconds. The third param is the frequency, how many times the unit chosen between executions.
In this example every 20 times 50 microsecs which is 1000 microsecs or every 1 millisecond.

Many things can be done in this function obviously. It’s not mandatory to do it this way but I think it’s a good practice.

Finally I attach the function terminate() to the signal the operating system sends to the program when we press Ctrl+C so that it gets called when this happens.

The function terminate() does the opposite to init() which is to free resources.

In my example I detach the interruptions I might have attached before:

_iocs_vdispst(
    (void *)NULL,
    0,  //0: vertical blanking interval 1: vertical display period
    0
);

_iocs_hsyncst ((void *)NULL); //horizontal interrupt

_iocs_crtcras (
    (void *)NULL,
    0 //int_ luster
);

_iocs_timerdst(
    (void *)NULL,   //Processing address (interrupt disabled at 0)
    0,              //Unit time (1 = 1.0, 2 = 2.5, 3 = 4.0, 4 = 12.5, 5 = 16.0, 6 = 25.0, 7 = 50.0, micro sec unit)
    0               //Counter (when 0, treat as 256)
);

This is important because hadn’t done it, although the program is closed the interrupts are still there running.

I activate back the command line cursor:

_iocs_b_curon();

I restore the screen mode:

_iocs_crtmod(last_mode);

and I finally exit the program with:

_dos_exit();

Lastly I’m going to explain the main() function which is the entry point to our program.

I would start calling the init() function described earlier, then we would have the body of the program. In this case I print the obligated Hello World! And an indication to press a button.

init();

//body of our program
_dos_c_print("Hello world !\r\n");
_dos_c_print("Press a key.\r\n");

//Afterwards we have a loop that stops when pressing a key but prints the number of milliseconds passing otherwise so that we can see the counting.

while(_dos_inpout(0xFF) == 0){
	_dos_c_locate(0,2);
    printf("counting %d \r\n", _timer);
}

In the X68000 we can use _dos_c_print() or printf() to print strings but _dos_c_print() does not support formats. It’s strictly like the command puts() in C++.
With _dos_c_locate(0,2); we set the cursor on the column 0 and row 2 so that the next thing will print from there. Otherwise it will print next line bellow ant the next and so on.

Hitting a key takes out the loop and we call terminate() and the program ends.

The complete code looks like this:

 #ifdef __MARIKO_CC__
	#include <doslib.h>
	#include <iocslib.h>
#else
	#include <dos.h>
	#include <iocs.h>
	#define interrupt __attribute__ ((interrupt_handler))
#endif

#include <stdio.h>
#include <signal.h>

char last_mode;                 // video mode before the program started

volatile int _timer = 0;        // time

void interrupt timer();         // for timing

void interrupt vsync_disp();    // for vertical sync

void interrupt hsyncst();       // for horizontal sync

void interrupt crtcras();       // for raster sync

void init();

void terminate();

int main(void)
{
    init();

    //body of our program
    _dos_c_print("Hello world !\r\n");
    _dos_c_print("Press a key.\r\n");

    while(_dos_inpout(0xFF) == 0){
        _dos_c_locate(0,2);
        printf("counting %d \r\n", _timer);
    }

    //end of our program
    terminate();

    return 0;
}

void init()
{
    last_mode = _iocs_crtmod(-1);   //capture the video mode before the program

    _iocs_b_curoff(); //disable the cursor

    _iocs_b_clr_al(); //clear the whole screen

    /**
     * Other initialization actions.
     */

     _iocs_timerdst(
        timer,  //Processing address (interrupt disabled at 0)
        7,       //Unit time (1 = 1.0, 2 = 2.5, 3 = 4.0, 4 = 12.5, 5 = 16.0, 6 = 25.0, 7 = 50.0, micro sec unit)
        20       //Counter (when 0, treat as 256)
    );

    signal(SIGINT, terminate); //for the Control + C
}

void terminate()
{
    /* Un interrupt */
	_iocs_vdispst(
        (void *)NULL,
        0,//0: vertical blanking interval 1: vertical display period
        0
    );

    _iocs_hsyncst ((void *)NULL); //horizontal interrupt

     _iocs_crtcras (
        (void *)NULL,
        0 //int_ luster
    );

    _iocs_timerdst(
        (void *)NULL,   //Processing address (interrupt disabled at 0)
        0,              //Unit time (1 = 1.0, 2 = 2.5, 3 = 4.0, 4 = 12.5, 5 = 16.0, 6 = 25.0, 7 = 50.0, micro sec unit)
        0               //Counter (when 0, treat as 256)
    );

    //we activate the console cursor
    _iocs_b_curon();

    //we restore the video mode
	_iocs_crtmod(last_mode);

	//we exit the program
	_dos_exit();
}

void interrupt timer()
{
	++_timer;
}

void interrupt vsync_disp()
{
	//whatever you do in this event
}

void interrupt hsyncst()
{
	//whatever you do in this event
	//it has to be real quick
}

void interrupt crtcras()
{
	//whatever you do in this event
}

You can also find it in my Githup at https://github.com/FedericoTech/X68KTutorials/tree/main/Anatomy

I hope this is useful as a starting point to X68000 programming.

Enjoy.

X68000 Programming chapter 2.2, setting up the IDE, Jason Stevens flavour.

The previous article explained how to set up the programming environment and to compile the Hello World on the Sharp X68000 with Lydux’s toolchain.

That article stuck to the instructions given by Lydux to install it.

In recent weeks I found another toolchain that turns out to be more faithful to the original one of Sharp X68000 because it utilizes several native libraries.

This other toolchain calls GCC 1.3 x68000 and has been adapted by Jason Stevens whose web is in https://virtuallyfun.com/

The approach of this toolchain is that it utilises a GCC version like the original one in the years of the Sharp X68000, the compiler running in Windows whilst the assembler and linker are native of X68k and run on a console emulator called run68 therefore we can use the genuine libraries whereas Lydux’s utilises brand news libraries which although are promising they are still in an early stage of development and have some bugs.

Because of this I decide to carrion on the line of the GCC 1.30 x68000.

Installing this toolchain is quite different. The instructions given by Jason Stevens are few and are to use it on a windows command line by running GCC directly or by a makefile.

However I managed to make it work with Code::Blocks in a way that can function the same as Lydux’s toolchain.

Therefore if you don’t have the Code::Blocks Ide yet, you can download it from: https://www.codeblocks.org/

Downloading the toolchain.

Now we download the GCC 1.30 x68000. We can find it in the following URL: https://sourceforge.net/projects/gcc-1-30-x68000/

To this day the file is called x68000-gcc130_21_06_2020.zip.zip and contains a folder called x68000

In my examples I’m going to install it at the root of E: therefore the path will be E:\x68000.

You can install it wherever you want but you have to remember the path because we have to set it in several places.

Configuring the run68.

Now we are going to configure the X68000 console emulator, run68. We have to tell it where to find some folders. In order to do that we edit the file E\x68000\bin\run68.ini and we set the paths according to where we unzipped the folder x68000 in the previous step.

In my case the file looks like this:

[all]
mainmemory=12
iothrough
[environment]
PATH=E:\x68000\XBIN;
INCLUDE=E:\x68000\INCLUDE
LIB=E:\x68000\LIB
PASCAL=E:\x68000\PASCAL
TEMP=E:\x68000\temp

Configuring the GCC environment.

The compiler of this toolchain leans on some environment variables that tell it where to find things.

The toolchain brings a sample file called E:\x68000\env.cmd. So likewise we open it and change the paths where we unzipped the folder x68000.

We will also add a line at the end which will be the command cmd so that it opens the console when clicking on it.

My file looks like this:

title x68000_GCC_1.30
set path=E:\x68000\bin;%PATH%
set TMPDIR=%TEMP%
set GCC_INCLUDE_DIR=E:\x68000\include
set INCLUDE=E:\x68000\include 
set LIB=E:\x68000\lib
set TEMP=E:\x68000\temp
@rem SET GCC_OPTION=LFIOAMP
SET GCC_OPTION=LFOAMP
set GCC_LINK=run68 silk229
set GCC_AS=run68 has060
cmd

Test compilation:

If you now do double click on the file a command line console opens up. This console has already all that is needed to compile the helloworld sample program.

We just run the command:

gcc -O hello.c

As a result we obtain the file hello.x which we could execute already on the Sharp X68000.

Although we haven’t seen it, the compiler is also making use of assembler has060 and the linker silk229 which are X68000 programs running on the run68 console emulator.

Configuring the Japanese language in the console.

Now I wanted to illustrate something. Let’s run the command run68 has060.

This should show a program description and the parameters available but while we can identify the parameters, the description of them is gibberish.

This is because as has060 is native of the Sharp X68000 which is a Japanese computer, the output it produces is in Japanese which it’s OK because now a days we can copy whatever it says and paste it on an internet translator and learn what it reads.

The problem is that we aren’t seeing it in Japanese either. This is because the encoding configured in the terminal is different. In my case it’s latin1 and we need it to show the characters in Japanese.

To fix this, what we need to do is to add chcp 932 before the command cmd in our file E:\x68000\env.cmd

If now we do double click and run the command run68 has060 again:

Now we can se the message correctly in Japanese.

One thing that attracts the attention when using this encoding is the symbol \ has been replaced by the yen symbol ¥. This is the Japanese day to day.

Setting the console in Japanese is because so far I didn’t manage Code::Blocks show the Japanese characters, therefore if any error message appears it won’t show correctly and I wouldn’t be able to copy-paste to translate it.

Therefore what I do is to execute the same compilation command of Code::Blocks in this console and catch it in Japanese characters to translate.

When I manage to show the Japanese in Code::blocks I’ll be back and update this.

Configuring Code::Blocks.

Until now we can already compile little programs in a single file. If we wanted to add modules we would need to run longer commands including those modules then link them one another and we would need a makefile by then to automatize it all and that is out of the scope of this tutorial.

Because of this is that we are going to configure Code::Blocks. In order to do that we’ll go to Settings→ compiller…

We are going to copy the compiler GNU GCC Compiler of the dropdown. It will pop a dialog to name it. The name has to be “X60000 GCC Compiler

It is important to stick to the name because it will be referenced by a template that we will use to create new projects.

Now we move onto the tab Linker settings

In this tab we click the button add and it will pop a dialog to select files.

We have to select the files E:\x68000\lib\libdos.a and E:\x68000\lib\libiocs.a

These two libraries are to access from C the native functions of the Sharp X68000 Human68k operating system.

Now we move onto the tab Search directories and in the sub tab Compiler we are going to add with the button add the directory E:\x68000\include.

This is for the compiler to have access to the header files like stdio.h, stdlib.h or those of the libraries earlier libdos.h and libiocs.h.

Lastly we go to Toolchain Executables.

In this tab we have a button where we can try to auto-detect but at least it doesn’t work for me.

Instead we go to the sub tab Program Files and manually we look for the file E:\x68000\bin\gcc.exe for C compiler, C++ compiler, and Linker for dynamic libs.

The field Linker for static libs probably contains ar.exe. We remove it and leave it empty.

Finally, in the field Make program we search for the file E:\x68000\bin\MAKE.EXE

Setting the three first fields pointing the gcc.exe file is because this version of GCC knows that it has to call run68 has060 and then run68 silk229 in those compilation stages.

Configuring a Code::Blocks launcher.

At this point the compiler is now configured in Code::blocks… but it won’t work.

This is because as I said at the beginning GCC relays on some environment variables which are the ones that tell it where to find several things and because of that is that we had to do that file at E:\x68000\env.cmd to be able to compile in console.

Therefore we need to do the same for Code::Blocks. To start with those environment variables.

For this we are going to copy the file E:\x68000\env.cmd and we are going to call it E:\x68000\CodeBlocks.cmd.

Now we open it up and change the line that says cmd for this other command:

cmd /c start "" "C:\Program Files\CodeBlocks\codeblocks.exe"

So that this file will look like this:

title x68000_GCC_1.30
set path=E:\x68000\bin;%PATH%
set TMPDIR=%TEMP%
set GCC_INCLUDE_DIR=E:\x68000\include
set INCLUDE=E:\x68000\include 
set LIB=E:\x68000\lib
set TEMP=E:\x68000\temp
@rem SET GCC_OPTION=LFIOAMP
SET GCC_OPTION=LFOAMP
set GCC_LINK=run68 silk229
set GCC_AS=run68 has060
cmd /c start "" "C:\Program
Files\CodeBlocks\codeblocks.exe"

Making double click in this batch we open the Code::Blocks with the environment variables and GCC is able to compile.

Configuring the wizard.

The last thing left to do is to configure a template that helps us to create a project with this toolchain straight away without having to configure anything else but the name and the path.

For this I made myself a template inspired in that of Lydux in the previous article and it’s available in my github at https://github.com/FedericoTech/X68KTutorials/blob/main/x68000_gcc_template.zip

When you download the file x68000_gcc_template.zip, inside there is a folder called x68000_gcc. You have to move it into the folder C:\Program Files\CodeBlocks\share\CodeBlocks\templates\wizard which is where Code::Blocks keeps the project creating wizards.

Lastly you need to open the file C:\Program Files\CodeBlocks\share\CodeBlocks\templates\wizard\config.script which is a file in a language similar to javascript, and inside the function RegisterWizard, you add this line:

RegisterWizard(wizProject, _T("x68000_gcc"), _T("X68000 GCC Project"), _T("Embedded Systems"));

In some area like in the image

It’s for this step that it’s important to respect the name of the compilator when we copied it some steps earlier.

Creating a project.

Now we can start Code::Clocks clicking on the file E:\x68000\CodeBlocks.cmd

BTW it’s not necessary that that file is in that path. You can place it wherever you want as the paths are absolute.

Now we create a X68000 GCC project like in the image.

Now we only need to follow the wizard giving a name to the project and it will create for us the HelloWorld sample program.

From here you can now compile.

The template generates the executable files .X in the folder default.

You can mount this folder as a floppy disk in the emulator and run it just as described in the previous article.

Enjoy.