PHP and C++ are two programming languages.
PHP is normally used as a server side language in web development. It’s interpreted which means that the program is written in plain text and a runtime program interprets it and executes the instructions.
C++ has application in many domains. The program is written also in plain text but a compiler translates it into machine instructions in an executable file in compilation time and it’s that executable file that runs on its own in runtime.
The two languages support Object Oriented Programming paradigm.
One remarkable difference between the two is that C++ can be many fold faster than PHP in the same domain. This doesn’t come free, on the other hand it’s much quicker to program and get something functional in PHP.
PHP is easier to program and to debug and there is no compilation time whereas C++ is all the opposite.
There are scenarios where it’s more convenient to invest time in development to get the most of the machine for various reasons like we have high workloads or because we are getting charged for computing power so we want to reduce the overhead of interpreting the code.
But we don’t need to pick one or the other, we can have both working hand by hand.
If in a PHP development we identify bottle necks we can replace pieces of code for C++.
The way of doing this is by creating a PHP module with an interface that define PHP functions and classes which are actually implemented in C++.
This code will run at full speed in your CPU as it doesn’t need to be interpreted.
In this article I’m going to describe how to prepare the environment to do this in Windows.
I’m going to use XAMP 8.1.12 which brings PHP 8.1.16 64 bits Thread Safe, and Visual Studio 2022.
PHP 8.1.16 in windows is compiled with Visual C and the Platform Tool MSVC 14.29.
This platform tool MSVC 14.29 belongs to Visual Studio 2015 but it’s too old. Instead we are going to install MSVC 14.29 in our Visual Studio 2022. BTW this instructions may work in VS 2017 and VS 2019.
CONFIGURING THE ENVIRONMENT:
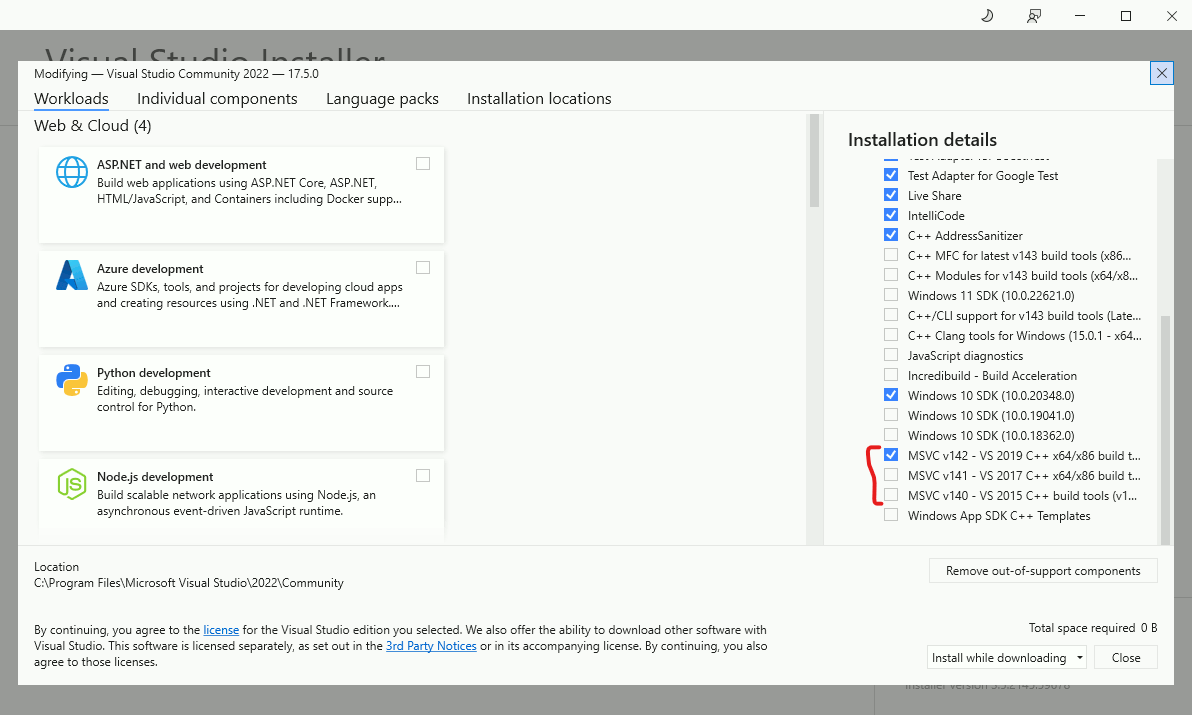
So we need to go to the Visual Studio Installer and click on Modify

In the next window we can select one of those MSVCs. As I’m explaining on VS 2022 I’m selecting the highest which is the exact version PHP 8 is compiled with, MSVC 14.29.
We also need to download the headers of PHP.
In https://windows.php.net/download/ search for PHP 8.1 VS16 x64 Thread Safe whose link is this:
https://windows.php.net/downloads/releases/php-devel-pack-8.1.16-Win32-vs16-x64.zip
This zip contains the headers of many PHP libraries and the .lib files for linking in Visual Studio.
So you unzip it somewhere.
Now we create a Visual Studio project. We want a Dynamic library but we can start with an empty project.
In my examples I called the project MyPHPModule.
Now, we need to set the path to the libraries and the Platform Toolset.
We do right click on the project and go to properties.
We make sure that Configuration is set to All Configurations and Platform to x64.
In the Properties window we go to Configuration Properties → General and in it we set:
Configuration Type as Dynamic Library (.dll)
Platform Toolset as Visual Studio 2019 (v142)
And for the sake of convenience we’ll change the Output Directory for the path to the module folder in our php distribution. In my case it’s C:\xampp\php\ext. So that the library is built right where it’s available for use by PHP.

Now we move to Configuration Properties → VC++ Directories and in the property Include Directories we set the paths:
php-8.1.16-devel-vs16-x64\include
php-8.1.16-devel-vs16-x64\include\main
php-8.1.16-devel-vs16-x64\include\TSRM
php-8.1.16-devel-vs16-x64\include\win32
php-8.1.16-devel-vs16-x64\include\Zend
Where php-8.1.16-devel-vs16-x64 is the folder were you unzipped the libraries, obviously you need to provide the path to that folder in those 5.
In the property Library Directories we do the same for the path to php-8.1.16-devel-vs16-x64\lib
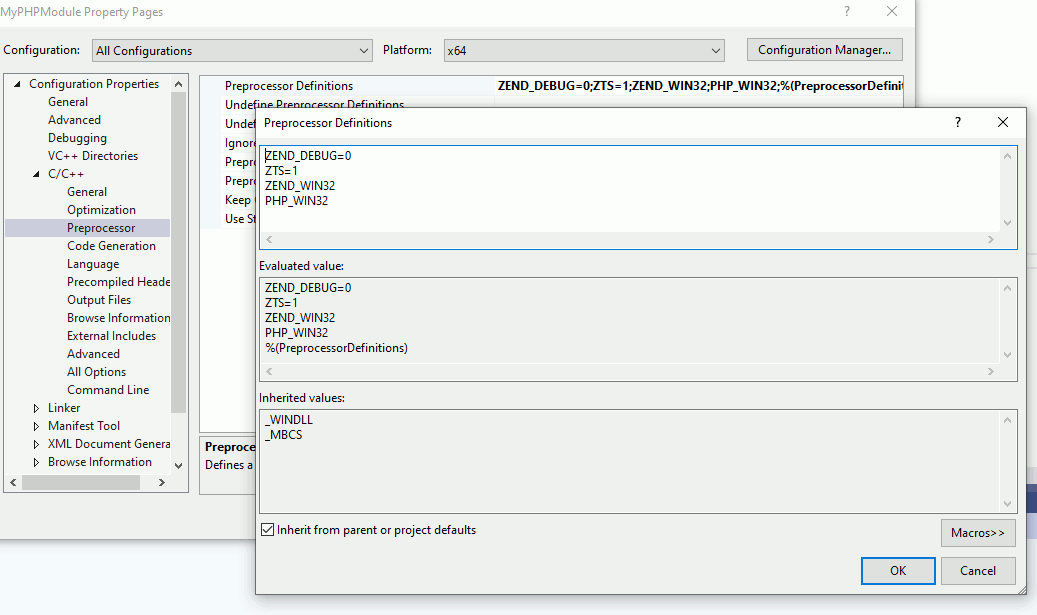
Now we move to Configuration Properties→ C/C++→ Preprocessor and in the property Preprocessor Definitions we set the following:
ZEND_DEBUG=0
ZTS=1
ZEND_WIN32
PHP_WIN32
This might be confusing at first. We are compiling for x64 platform but still we need to set the flags ZEND_WIN32 and PHP_WIN32 These _WIN32 only means Windows.
The last configuration now is to move to Configuration Properties → Linker → Input and in the property Additional Dependencies the value php8ts.lib.
Now we are good to go.
PROGRAMMING OUR FIRST MODULE
Now we are going to create a .cpp file. In my case the file MyPHPModule.cpp
My Module is going to have a function that prints “Hello World!!”, a function that takes two params and returns their multiplication, a function that counts up to a given number and a function that takes two arrays and returns an array with the sum of the two value by value.
We first include the PHP library:
#include <php.h>Now we define the four functions:
PHP_FUNCTION(hello_world) {

	ZEND_PARSE_PARAMETERS_NONE();

	php_printf("Hello World!\n");

	RETURN_NULL();
}

PHP_FUNCTION(counting)
{
	zend_long n;

	ZEND_PARSE_PARAMETERS_START(1, 1)
		Z_PARAM_LONG(n)
	ZEND_PARSE_PARAMETERS_END();

	volatile zend_long count = 0;
	for (; count < n; count++);

	RETURN_LONG(count);
}

ZEND_FUNCTION(multiply)
{
	zend_long x, y;

	ZEND_PARSE_PARAMETERS_START(2, 2)
		Z_PARAM_LONG(x)
		Z_PARAM_LONG(y)
	ZEND_PARSE_PARAMETERS_END();

	RETURN_LONG(x * y);
}

PHP_FUNCTION(sum_arrays) {

	zval *arr1 = nullptr, *arr2 = nullptr;


	//we accept two params and the two are required
	ZEND_PARSE_PARAMETERS_START(2, 2)
		Z_PARAM_ARRAY(arr1) //the param 1 is an array
		Z_PARAM_ARRAY(arr2) //the param 2 is an array
	ZEND_PARSE_PARAMETERS_END();

	std::size_t arr1c = 0, arr2c = 0;
	arr1c = zend_array_count(Z_ARR_P(arr1));
	arr2c = zend_array_count(Z_ARR_P(arr2));

	zend_array *za1 = nullptr, *za2 = nullptr;
	std::size_t siz;

	//if the arra1 is longer than the arra2
	if (arr1c > arr2c) {
		za1 = Z_ARR(*arr1);
		za2 = Z_ARR(*arr2);
		siz = arr2c;
	}
	//if the arra2 is longer than the arra1
	else {
		za1 = Z_ARR(*arr2);
		za2 = Z_ARR(*arr1);
		siz = arr1c;
	}

	//we go through the array
	for (std::size_t index = 0; index < siz; index++) {
		//add the element of arr2 to arra1
		Z_LVAL_P(zend_hash_index_find(za1, index)) += Z_LVAL_P(zend_hash_index_find(za2, index));
	}

	//we return the arra1 with the values added.
	RETVAL_ARR(za1);
}
As you may have noticed we use macros to declare the functions and it’s inside the functions that we extract the parameters with the macros ZEND_PARSE_PARAMETERS_* and Z_PARAM_*.
ZEND_PARSE_PARAMETERS_START accepts two parameters, the first one is minimum number of parameters the function receives, the compulsory ones, and the second number is the max number of params.
It’s not like function prototypes in C or C++. This is because these functions are actually entry points to the module. Parameters and return value enter and leave the module through these functions declared this way. We can either implement the functionality right there or inside another functions called from them.
The prototype of those functions are expressed this way.
//prototype of function hello_world;
ZEND_BEGIN_ARG_INFO(arginfo_hello_world, 0)
ZEND_END_ARG_INFO()

//prototype of function counting;
ZEND_BEGIN_ARG_INFO(arginfo_counting, 0)
	ZEND_ARG_INFO(0, n)
ZEND_END_ARG_INFO()

//prototype of function multiply;
ZEND_BEGIN_ARG_INFO(arginfo_multiply, 0)
	ZEND_ARG_INFO(0, x)
	ZEND_ARG_INFO(0, y)
ZEND_END_ARG_INFO()

//prototype of function sum_arrays;
ZEND_BEGIN_ARG_INFO(arginfo_sum_arrays, 0)
	ZEND_ARG_ARRAY_INFO(0, arr1, 0)
	ZEND_ARG_ARRAY_INFO(0, arr2, 0)
ZEND_END_ARG_INFO()
The macro ZEND_BEGIN_ARG_INFO start variables called arginfo_ and the macro ZEND_ARG_INFO declares each parameter, whether by ref or by value, the name and whether accepts null.
In the following peace of code we gather all the functions and their definitions:
static zend_function_entry hello_world_functions[] = {

	PHP_FE(hello_world, arginfo_hello_world)
	PHP_FE(counting, arginfo_counting)
	PHP_FE(multiply, arginfo_multiply)
	PHP_FE(sum_arrays, arginfo_sum_arrays)
	PHP_FE_END
};
As you can see it’s an array and with the macro PHP_FE we link the function with its arginfo_<function>
We can declared some standard callbacks like PHP_MINFO_FUNCTION:
PHP_MINFO_FUNCTION(hello_world)
{
	php_info_print_table_start();
	php_info_print_table_header(2, "Hello World Module", "enabled");
	php_info_print_table_row(2, "Some parameter", "Some value");
	php_info_print_table_end();
}
which is used to print details about the module when running a phpinfo().
Finally we can put all together with this other structure:
/* Define the module entry */
extern zend_module_entry  hello_world_module_entry = {
	STANDARD_MODULE_HEADER,
	"hello_world",			/* Extension name */
	hello_world_functions,		/* zend_function_entry */
	NULL,				/* PHP_MINIT - Module initialization */
	NULL,				/* PHP_MSHUTDOWN - Module shutdown */
	NULL,				/* PHP_RINIT - Request initialization */
	NULL,				/* PHP_RSHUTDOWN - Request shutdown */
	PHP_MINFO(hello_world),		/* PHP_MINFO - Module info (PHP Info) */
	"1.0",				/* Version */
	STANDARD_MODULE_PROPERTIES
};
And register the module:
ZEND_GET_MODULE(hello_world)CONFIGURING PHP
Assuming that the module gets compiled in the folder for modules, in my case C:\xampp\php\ext so it’s there, we just need to open the php.ini, in my case in the path C:\xampp\php and add the line:
extension=MyPHPModule.dllNow, we can test whether the module is there with the next command in command line:
php -m | findstr hello_worldIf present we’ll get hello_world
Another test we can do is to make a .php file with a phpinfo() call:
<?php
phpinfo();
and with the browser explore that file. In my local server is the url http://localhost/MyPHPModule/
PHP will show the details we set in the callback function PHP_MINFO_FUNCTION

If we see either of them the module is correctly set up and we are ready to use in PHP.
PHP TESTS
We can now create a .php file and call the four functions we implemented in C++.
We can start with this little script:
<?php
echo '<pre>';
hello_world();
If we run it with the browser we get a Hello World!
Let’s now try the following test:
 $times = 100000;

$milliseconds = floor(microtime(true) * 1000);

//loop that only counts
for($n = 0; $n < $times ; $n++){
	;
}

$milliseconds = floor(microtime(true) * 1000) - $milliseconds;

echo "PHP loop took milliseconds: $milliseconds\n";
We are going to compare the performance of just counting.
We set the number of times we want to count in the var $times.
Then we capture the timestamp and right after we have a for loop.
After the for loop we get the time again and subtract the time we previously took so that we have the time it took to run the for loop.
Now we can do the same with our function counting():
$milliseconds = floor(microtime(true) * 1000);

//calling our counting function
$count = counting($times);

$milliseconds = floor(microtime(true) * 1000) - $milliseconds;

echo "Our module's loop took milliseconds: $milliseconds\n";
When racing one against the other you will get such result as this:
PHP loop took milliseconds: 7
Our module's loop took milliseconds: 0
you can try with bigger numbers.
The next bit is to test the multiply() function:
//testing our multiply function.
echo '3 * 3 = ' . multiply(3,3) . PHP_EOL;
This function doesn’t actually pose any improvement in performance. It’s just a demonstration of a function that accepts params and returns results.
The last test is our sum_arrays function:
//the first array contains numbers from 0 through 10
$arr = range(0, 10);

//the second array only then 1s
$arr2 = array_fill(0, 10, 1);

//we sum the values of the first and second arrays into a third array;
$arr3 = sum_arrays($arr, $arr2);

print_r($arr3);
In this tests we create two arrays, one has numbers from 0 to 10 and the other only 1s.
The function sums one array to the other element by element.
The this function is nearly 20 times faster than its counterpart in PHP.
We can make it even faster if our module was capable to send those arrays to the GPU and parallelize the calculation.
You can see the potential that moving PHP parts into C++ has.
I hope you enjoy this tutorial.