
I was researching how to make unit tests in C++ due to an online course about Google Test.
In the process of installing the environment I found a number of challenges that I had to overcome beyond of what the course taught and I decided that I would be matter for an article.
In this article I’m going to describe how to install Google Test in Eclipse CDT, Git, CMake and MinGW-W64 in Windows from scratch.
Installing Eclipse:
Eclipse is an open source integrated development environment. It’s got a lots of modules to make it suitable to develop in languages like Java, PHP, and many more and of course for C++.
The Eclipse for C++ is called Eclipse CDT which means C/C++ Development Tooling.
One way to obtain CDT is by installing the plug in upon a plain Eclipse.
Eclipse with CDT is also available for download at https://www.eclipse.org/downloads/packages/release/2022-06/r/eclipse-ide-cc-developers
In the download links place you can find the ones for Windows, Linux and Mac OS.
The one I downloaded at the time of this article was: https://www.eclipse.org/downloads/download.php?file=/technology/epp/downloads/release/2022-06/R/eclipse-cpp-2022-06-R-win32-x86_64.zip
You can unzip it wherever you want.
Installing MinGW-W64.
Eclipse on its own it not more than a very sophisticated notepad. It doesn’t include any compiler but it uses any compiler you may have. It could be the one of Visual C, or Clang or like in our case MinGW-W64.
MinGW-W64 is one of several GCC distributions for Windows like Cygwin or MSY2.
The MinGW project is hosted at https://sourceforge.net/projects/mingw-w64/
There is an install wizard with which you can select some aspects like the architectures x86_64 or i686 (64 or 32 bits respectively), or whether whether you want it to simulate the posix interface of the Unix-like operating systems or win32 straight away, and to choose between sjlj, seh and dwarf.
These last three are standards that have to do with the way you want to deal with exceptions but I don’t understand it yet.
Well, the Installer doesn’t work so don’t download it. Instead you want to go to the files section and there you’ll see all the versions available.
As I don’t understand much about the versions available I only download the one I have seen more common and that is x86_64, posix, and she, version 8.1.0 at the moment of this article.
Here is the link to that file: https://sourceforge.net/projects/mingw-w64/files/Toolchains%20targetting%20Win64/Personal%20Builds/mingw-builds/8.1.0/threads-posix/seh/x86_64-8.1.0-release-posix-seh-rt_v6-rev0.7z
We unzip the file. Normally this goes in C:\mingw64 but you can place it wherever you want. Only remember the path.
Inside the folder there is the folder bin. You have to add that folder C:\mingw64\bin in the Windows environment var called PATH so that the executables are all available.
Once added you can go to the command line with Win+R and type cmd and in the console type gcc -v and check that GCC is now available.
Installing CMake
Another tool we need in order to install Google Test is CMake.
When a C or C++ program has more files than the main.c file it is necessary a tool to automatically compile without having to type all the commands and their libraries.
For this purposes the tool Make was invented and is included in almost all compilers.
This tool reads from a file called Makefile where it’s all the instructions to compile your project.
The problem came when projects had to be multiplatform and they had to have different Makefiles for each.
o solve that problem another tool was invented call Configure which automatically assessed your system and what dependences it satisfied and created a tailored Makefile for it which could be used with the Make command.
The problem with this tool is that it’s so versatile and complex that sometimes it’s set up is larger and more complex than the project that we’re trying to compile. Because of this we now have CMake.
CMake is therefore to create the Makefile but in an easy way and it’s the last trend.
CMake is available to download at https://cmake.org/download/ and it’s got an installer in Windows.
When you install it you have to add the path of its executables in the PATH. Presumably in C:\Program Files\CMake\bin
In the command line like we did before we can check that it’s been installed correctly by running the command:
cmake -versionInstalling Git
The Google Test project is hosted at github.org and in order to download it we need the program Git which is a control version source software. it’s the most popular.
You can find it at https://git-scm.com/downloads
Once installed, in the command line you can check whether it installed correctly with this command:
git --versionCompiling Google Test
Now we can download the Google Test sources and compile it although it won’t be the last stage in this journey.
You need to find a place to download Google Test. If you opened the Eclipse it probably created a folder in the path: C:\Users\your user\eclipse-workspace. This is a good place to go.
In the folder you choose you have to run the following command:
git clone https://github.com/google/googletest.gitThis downloads the source code of Google Test inside the folder googletest therefore let’s go in:
cd googletestThen we create a fonder inside where we are going to compile the library.
We may use the shell commands like mkdir but CMake provides a shell agnostic command to do it in any operating system.
cmake -E make_directory mingw_buildNow we are going to make use of CMake to compile the project but we aren’t going to run the plain command because by default it will build a project to be compiled by Visual C. Instead we have to pass a number of parameters to tell it to compile with MinGW-W64 therefore we run the following commands:
cmake -E chdir mingw_build cmake -G "MinGW Makefiles" -D CMAKE_C_COMPILER=gcc.exe -D CMAKE_CXX_COMPILER=g++.exe -D CMAKE_MAKE_PROGRAM=mingw32-make.exe ..The first part tells CMake to work inside the folder mingw_build and to create a project suitable to be compile with MinGW-W64.
Now we build it and installing with this two commands also shell agnostic.
cmake --build mingw_build
cmake --install mingw_build
For the command install you may need Admin privileges because it’s going to install it inside the folder C:/Program Files (x86)
After a while it will have compiled and will be ready to use in our project.
Setting up Eclipse for unit tests.
Eclipse has a plug in with which automatize unit test so let’s install it.
Up in the tool bar, Help, in the option menu we click on Install New Software… A dialogue window opens.
There is a drop down named Working with: Select the repository: 2022-03 – https://download.eclipse.org/releases/2022-03 which is true at the moment of this article.
There is a try underneath, we go to Programming Languages and inside it, C/C++ Unit Testing Support.
This for now, later we will configure our project with it.
Creating a project.
Now we create a new project so we go File → New → C/C++ Project. This opens up a window.
I’d suggest to create it of the type C++ Managed Build. This means that Eclipse is responsible to compile and link automatically.
In the next page in the window we give the project a name and in Project Type we can chose Hello World C++ Project. In the list next to it we can see the toolchains available. We chose MinGW GCC.
Now we should have a project with a sample code with the obligated Hello World.
Now, In the project list of the Project Explorer we click with the right button of the mouse and from the option menu we select properties and a window opens up.
In this window there is a tree on the left side. We go to C/C++ General → Paths and Symbols.
On the right hand of the tree there are several tabs.
We move onto the tab Includes and in the languages list we select GNU C++ and on the right side of it we click on add…
Another dialogue opens up. We now click on File system… and look for a the folder include of Google Test. It would be like this: C:/Program Files (x86)/googletest-distribution/include
Now we move onto the tab Library Paths and in the same way we click on add… In the next dialogue we click on File System… as we did earlier but now we’re looking for the folder C:/Program Files (x86)/googletest-distribution/lib/
Finally we go back to the property tree to C/C++ Build → Settings and in the tab Tool Settings there is another tree. We move onto MinGW C++ Linker → Libraries and on the right side will see two lists, one empty and the other with the path to C:\Program Files (x86)\googletest-distribution\lib that we previously entered.
In the empty list we need to add library twice, and enter gtest and gtest_main as in the image:
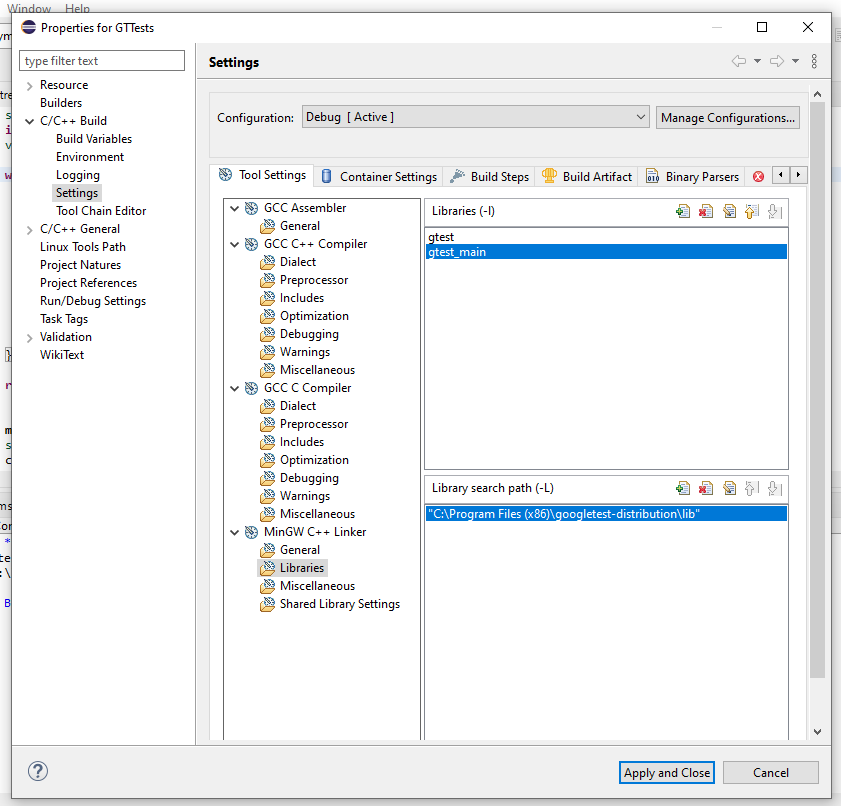
Now our project can compile linking the Google Test library.
Adding the test runner.
Now we add the test runner which is for using the unit test plug in that we installed earlier to our Eclipse.
In order to do that we search the tool bar for the button run, but the one with the little arrow pointing down. A menu opens up and from it we click on Run Configurations…
This opens a new window with a tree on the left. In this tree we look for C/C++ unit and with it selected we click the button new on the top of the tree and this will create a new node beneath C/C++ unit.
On the right of the tree we have the name of the test runner.
We can change it if we want. I called mine GTTests Unit Tests.
Bellow it, we have several tabs. let’s go to C/C++ Testing. Here we find a very simple for. it’s got a drop down named Test Runner. We select Google Tests Runner.

Testing it all.
At this point we have everything set up and ready to test that it works.
We go back to our code. We can delete it all and replace it with this other:
#include <iostream>
#include <gtest/gtest.h>

TEST(FooTest, tests_foo){
	ASSERT_TRUE(true);
}
Now we click on the button compile, the one with the hammer.
To run it we can click run.
This renders an output in the console that tells us that it has passed the test, because the test is designed to be passed.
But this is the output that we get when we run the executable as it is.
As now we have a test runner we can select it in the drop down menu beside, in my case I called it GTTests Unit Tests. And now we click on run.
Now what we see is the runner instead of the console with the details in a more friendly format.
Up till now this article. In next articles we’ll immerse ourselves in doing units tests.
